<?xml version="1.0" encoding="utf-8"?><feed xmlns="http://www.w3.org/2005/Atom" ><generator uri="https://jekyllrb.com/" version="4.2.2">Jekyll</generator><link href="https://ivanpua.com/feed.xml" rel="self" type="application/atom+xml" /><link href="https://ivanpua.com/" rel="alternate" type="text/html" /><updated>2025-01-26T21:33:14+11:00</updated><id>https://ivanpua.com/feed.xml</id><title type="html">Ivan Pua</title><subtitle>A blog about startups and AI</subtitle><author><name>Ivan</name></author><entry><title type="html">How to Fix OOM Errors in Spark</title><link href="https://ivanpua.com/data-engineering/fix-oom/" rel="alternate" type="text/html" title="How to Fix OOM Errors in Spark" /><published>2025-01-26T15:00:00+11:00</published><updated>2025-01-26T15:00:00+11:00</updated><id>https://ivanpua.com/data-engineering/fix-oom</id><content type="html" xml:base="https://ivanpua.com/data-engineering/fix-oom/"><![CDATA[<h2 id="what-is-an-oom-error">What is an OOM Error?</h2>

<p>An Out of Memory (OOM) error in Apache Spark occurs when either the driver or executors exceed the memory allocated to them. This typically happens when the memory requirements of your Spark job surpass the configured limits.</p>

<figure class="align-center">
  <img src="https://ivanpua.com/assets/images/oom/error.png" alt="" />
  <figcaption>Example of an Out of Memory error message.</figcaption>
</figure>

<h2 id="how-to-confirm-its-an-oom-error">How to Confirm It’s an OOM Error?</h2>

<p>Sometimes, the cause of failure is not explicitly labeled as an OOM error. For instance, in Spark 2.0 on AWS Glue, you might encounter subtle error messages like this:</p>

<p><code class="language-plaintext highlighter-rouge">An error occurred while calling o71.sql. error while calling spill() on org.apache.spark.util.collection.unsafe.sort.UnsafeExternalSorter@74230e8e : No space left on device</code>.</p>

<p>On AWS Glue, you can use metrics such as the <strong>Memory Profile Graph</strong> to monitor memory usage for both the driver and executors. If some executor memory graphs end prematurely compared to others, it’s a strong indicator of an OOM error. Refer to the <a href="https://docs.aws.amazon.com/glue/latest/dg/monitor-profile-debug-oom-abnormalities.html">AWS Glue documentation</a> for more details.</p>

<figure class="align-center">
  <img src="https://ivanpua.com/assets/images/oom/mem-profile.png" alt="" />
  <figcaption>Memory profile graph in AWS Glue console showing executors ending prematurely.</figcaption>
</figure>

<h2 id="causes-and-solutions-for-oom-errors">Causes and Solutions for OOM Errors</h2>

<h3 id="quick-fixes">Quick Fixes</h3>
<ol>
  <li>Upgrade the Cluster: Start by selecting a cluster with larger memory.</li>
  <li>Adjust Memory Settings: Configure memory settings for both the driver and executors, as detailed in my previous <a href="/data-engineering/optimising-spark/">post</a>.</li>
  <li>Leverage Adaptive Query Execution (AQE): For Spark 3.0+, enable AQE to dynamically optimize query execution:</li>
</ol>

<h3 id="oom-in-executors">OOM in Executors</h3>

<h4 id="1-data-skew">1. <strong>Data Skew</strong></h4>
<p>Certain partitions might be disproportionately large compared to others, causing the associated executors to run out of memory.<br />
<strong>Solution</strong>: Refer to the “Handling Skew in Spark” section in the <a href="/data-engineering/optimising-spark/">previous blog post</a>.</p>

<h4 id="2-too-few-partitions">2. <strong>Too Few Partitions</strong></h4>
<p>As the data volume increases, keeping the number of shuffle partitions constant can result in larger partition sizes. This can exhaust the executor’s memory and even the local disk during intermediate stages.<br />
<strong>Solution</strong>: Increase the number of shuffle partitions by setting:</p>
<div class="language-python highlighter-rouge"><div class="highlight"><pre class="highlight"><code><span class="n">spark</span><span class="p">.</span><span class="n">conf</span><span class="p">.</span><span class="nb">set</span><span class="p">(</span><span class="s">"spark.sql.shuffle.partitions"</span><span class="p">,</span> <span class="o">&lt;</span><span class="n">new_number</span><span class="o">&gt;</span><span class="p">)</span>
</code></pre></div></div>
<h4 id="3-too-many-cores-per-executor">3. Too Many Cores per Executor</h4>
<p>The number of cores determines how many tasks an executor can run in parallel. While more cores can speed up execution, it also reduces the memory available for each task.
<strong>Solution</strong>: Reduce <code class="language-plaintext highlighter-rouge">spark.executor.cores</code>. The optimal range is typically 4–6 cores per executor.</p>

<h3 id="oom-in-driver">OOM in Driver</h3>
<h4 id="1-dfcollect">1. <code class="language-plaintext highlighter-rouge">df.collect()</code></h4>

<p>When using <code class="language-plaintext highlighter-rouge">collect()</code>, data from all executors is sent to the driver, potentially overwhelming its memory.
<strong>Solutions</strong>:</p>
<ul>
  <li>Use <code class="language-plaintext highlighter-rouge">repartition()</code> to limit the size of data collected by the driver.</li>
  <li>Configure the <code class="language-plaintext highlighter-rouge">spark.driver.maxResultSize</code> setting to allocate more memory for results:
    <div class="language-python highlighter-rouge"><div class="highlight"><pre class="highlight"><code><span class="n">spark</span><span class="p">.</span><span class="n">conf</span><span class="p">.</span><span class="nb">set</span><span class="p">(</span><span class="s">"spark.driver.maxResultSize"</span><span class="p">,</span> <span class="s">"2g"</span><span class="p">)</span>  <span class="c1"># Example
</span></code></pre></div>    </div>
  </li>
  <li>Avoid using <code class="language-plaintext highlighter-rouge">collect()</code> whenever possible, and instead write the data to external storage.</li>
</ul>

<h4 id="2-broadcast-joins">2. Broadcast Joins</h4>
<p>Broadcasting a table requires the driver to materialize the table in memory before sending it to executors. If the table is too large or multiple tables are broadcasted simultaneously, OOM errors can occur.
<strong>Solutions</strong>:</p>
<ul>
  <li>Increase driver memory with spark.driver.memory.</li>
  <li>Set <code class="language-plaintext highlighter-rouge">spark.sql.autoBroadcastJoinThreshold</code> to a lower value to avoid broadcasting excessively large tables:
    <div class="language-python highlighter-rouge"><div class="highlight"><pre class="highlight"><code><span class="n">spark</span><span class="p">.</span><span class="n">conf</span><span class="p">.</span><span class="nb">set</span><span class="p">(</span><span class="s">"spark.sql.autoBroadcastJoinThreshold"</span><span class="p">,</span> <span class="s">"10MB"</span><span class="p">)</span>
</code></pre></div>    </div>
  </li>
</ul>

<h2 id="pro-tips-to-avoid-oom">Pro Tips to Avoid OOM</h2>
<ol>
  <li>Monitor Memory Usage: <a href="https://stackoverflow.com/questions/40022599/spark-how-to-monitor-the-memory-consumption-on-spark-cluster">Use the Spark UI to track memory consumption.</a></li>
  <li>Avoid Excessive Shuffles: Keep shuffle operations minimal, as they are memory-intensive.</li>
</ol>]]></content><author><name>Ivan</name></author><category term="data-engineering" /><category term="data-engineering" /><summary type="html"><![CDATA[A detailed guide on understanding and resolving Out of Memory (OOM) errors in Apache Spark.]]></summary></entry><entry><title type="html">Optimising Spark - Joins, Shuffle, and Skew</title><link href="https://ivanpua.com/data-engineering/optimising-spark/" rel="alternate" type="text/html" title="Optimising Spark - Joins, Shuffle, and Skew" /><published>2025-01-26T11:00:00+11:00</published><updated>2025-01-26T11:00:00+11:00</updated><id>https://ivanpua.com/data-engineering/optimising-spark</id><content type="html" xml:base="https://ivanpua.com/data-engineering/optimising-spark/"><![CDATA[<h2 id="what-is-spark">What is Spark?</h2>

<p>Apache Spark is a distributed computing engine designed for processing large datasets efficiently. It provides multiple query engines: the RDD API (the foundational, low-level abstraction), DataFrame and Dataset APIs available in various programming languages, and Spark SQL for working with structured data using SQL syntax. For a detailed explanation of query engines, check out my <a href="/data-engineering/query-engines/">previous post</a>.</p>

<p>Spark is significantly faster than its predecessor, Hive, which primarily relies on disk-based storage. Spark excels by leveraging in-memory processing, reducing reliance on disk I/O. It only spills to disk when data cannot fit in memory, thus optimizing memory usage is crucial to avoid this, as excessive disk use can degrade Spark’s performance and making it behave like Hive.</p>

<h2 id="spark-architecture">Spark Architecture</h2>

<p>Spark operates with three primary components:</p>

<figure class="align-center">
  <img src="https://ivanpua.com/assets/images/optimising_spark/driver_executor.png" alt="" />
  <figcaption>Relationship between driver and workers (executors) </figcaption>
</figure>

<h3 id="plan">Plan</h3>
<ul>
  <li><strong>Lazily evaluated</strong>: Execution occurs only when explicitly triggered, such as with <code class="language-plaintext highlighter-rouge">df.collect()</code>.</li>
</ul>

<h3 id="driver">Driver</h3>
<ul>
  <li>Acts as the “Coach” or the “brain” of the application.</li>
  <li>Determines when to stop lazy evaluation, decides how to join datasets, and sets the level of parallelism for each step.</li>
  <li>Key settings:
    <ul>
      <li><code class="language-plaintext highlighter-rouge">spark.driver.memory</code>:
        <ul>
          <li>Allocates memory to the driver process.</li>
          <li>Low values can lead to disk spills or out-of-memory errors.</li>
          <li>Default: 2GB. Increase for complex queries (up to 16GB, depending on your workload).</li>
        </ul>
      </li>
      <li><code class="language-plaintext highlighter-rouge">spark.driver.memoryOverheadFactor</code>:
        <ul>
          <li>Percentage of memory reserved for non-heap tasks (e.g. JVM overhead).</li>
          <li>Increase this value for complex plans that require more processing.</li>
        </ul>
      </li>
    </ul>
  </li>
</ul>

<h3 id="executors">Executors</h3>
<ul>
  <li>Act as the “Players” that execute tasks assigned by the Driver.</li>
  <li>Key settings:
    <ul>
      <li><code class="language-plaintext highlighter-rouge">spark.executor.memory</code>:
        <ul>
          <li>Memory allocated to each executor.</li>
          <li>Low values can cause disk spills or out-of-memory errors.</li>
          <li>Test with different values (e.g., 2GB, 4GB, 8GB) to find the optimum configuration.</li>
        </ul>
      </li>
      <li><code class="language-plaintext highlighter-rouge">spark.executor.cores</code>:
        <ul>
          <li>Determines the number of tasks each executor can run in parallel.</li>
          <li>This setting is also constrained by the number of cores in a single executor.</li>
          <li>Optimal range: 4–6 cores per executor. Higher values may lead to out-of-memory errors.</li>
        </ul>
      </li>
      <li><code class="language-plaintext highlighter-rouge">spark.executor.memoryOverheadFactor</code>:
        <ul>
          <li>Percentage of memory reserved for non-heap tasks like UDF execution.</li>
          <li>Increase for workloads with many complex UDFs.</li>
        </ul>
      </li>
    </ul>
  </li>
</ul>

<h3 id="cluster-manager">Cluster Manager</h3>
<ul>
  <li>Acts as the “Manager” of the team.</li>
  <li>Allocates resources to Spark applications and manages executors.</li>
  <li>Examples: Kubernetes, Hadoop YARN.</li>
</ul>

<h2 id="types-of-joins-in-spark">Types of Joins in Spark</h2>

<h3 id="shuffle-sort-merge-join">Shuffle Sort-Merge Join</h3>
<ul>
  <li><strong>Default join strategy</strong> since Spark 2.3.</li>
  <li>Suitable for joining two large datasets.</li>
  <li>Example:
    <div class="language-python highlighter-rouge"><div class="highlight"><pre class="highlight"><code><span class="n">result</span> <span class="o">=</span> <span class="n">df1</span><span class="p">.</span><span class="n">join</span><span class="p">(</span><span class="n">df2</span><span class="p">,</span> <span class="s">"id"</span><span class="p">)</span>
</code></pre></div>    </div>
  </li>
</ul>

<h3 id="2-broadcast-hash-join">2. Broadcast Hash Join</h3>
<ul>
  <li>Faster as it avoids shuffling.</li>
  <li>Best when one side of the join is small enough to fit in memory.</li>
  <li>Controlled by <code class="language-plaintext highlighter-rouge">spark.sql.autoBroadcastJoinThreshold</code> (default: 10MB). Recommended range is between 1MB to 1GB.</li>
  <li>Example:
    <div class="language-python highlighter-rouge"><div class="highlight"><pre class="highlight"><code><span class="kn">from</span> <span class="nn">pyspark.sql.functions</span> <span class="kn">import</span> <span class="n">broadcast</span>
<span class="n">result</span> <span class="o">=</span> <span class="n">dfLarge</span><span class="p">.</span><span class="n">join</span><span class="p">(</span><span class="n">broadcast</span><span class="p">(</span><span class="n">dfSmall</span><span class="p">),</span> <span class="s">"id"</span><span class="p">)</span>
</code></pre></div>    </div>
  </li>
</ul>

<h3 id="3-bucket-join">3. Bucket Join</h3>
<ul>
  <li>Faster as it avoids shuffling by pre-bucketing tables.</li>
  <li>Ideal for queries with multiple joins or aggregations.</li>
  <li>Tables are bucketed by a key (e.g. <code class="language-plaintext highlighter-rouge">user_id</code>) and divided into buckets via modulus operation.</li>
  <li>Buckets of one table align with those of another (e.g., <code class="language-plaintext highlighter-rouge">bucket1</code> of table A matches <code class="language-plaintext highlighter-rouge">bucket1</code> of table B).</li>
  <li><strong>Best practice</strong>: Use bucket counts as powers of 2 (e.g. 16).</li>
  <li>Drawback: Initial parallelism is limited by the number of buckets.</li>
  <li>Example:
    <div class="language-python highlighter-rouge"><div class="highlight"><pre class="highlight"><code><span class="c1"># Bucket the Users Table
</span><span class="n">users</span><span class="p">.</span><span class="n">write</span> \
    <span class="p">.</span><span class="n">bucketBy</span><span class="p">(</span><span class="mi">4</span><span class="p">,</span> <span class="s">"user_id"</span><span class="p">)</span> \
    <span class="p">.</span><span class="n">sortBy</span><span class="p">(</span><span class="s">"user_id"</span><span class="p">)</span> \
    <span class="p">.</span><span class="n">mode</span><span class="p">(</span><span class="s">"overwrite"</span><span class="p">)</span> \
    <span class="p">.</span><span class="n">saveAsTable</span><span class="p">(</span><span class="s">"bucketed_users"</span><span class="p">)</span>

<span class="c1"># Bucket the Transactions Table
</span><span class="n">transactions</span><span class="p">.</span><span class="n">write</span> \
    <span class="p">.</span><span class="n">bucketBy</span><span class="p">(</span><span class="mi">4</span><span class="p">,</span> <span class="s">"user_id"</span><span class="p">)</span> \
    <span class="p">.</span><span class="n">sortBy</span><span class="p">(</span><span class="s">"user_id"</span><span class="p">)</span> \
    <span class="p">.</span><span class="n">mode</span><span class="p">(</span><span class="s">"overwrite"</span><span class="p">)</span> \
    <span class="p">.</span><span class="n">saveAsTable</span><span class="p">(</span><span class="s">"bucketed_transactions"</span><span class="p">)</span>
  
<span class="c1"># Read the bucketed tables
</span><span class="n">bucketed_users</span> <span class="o">=</span> <span class="n">spark</span><span class="p">.</span><span class="n">table</span><span class="p">(</span><span class="s">"bucketed_users"</span><span class="p">)</span>
<span class="n">bucketed_transactions</span> <span class="o">=</span> <span class="n">spark</span><span class="p">.</span><span class="n">table</span><span class="p">(</span><span class="s">"bucketed_transactions"</span><span class="p">)</span>

<span class="c1"># Perform the join
</span><span class="n">result</span> <span class="o">=</span> <span class="n">bucketed_users</span><span class="p">.</span><span class="n">join</span><span class="p">(</span><span class="n">bucketed_transactions</span><span class="p">,</span> <span class="s">"user_id"</span><span class="p">)</span>
</code></pre></div>    </div>
  </li>
</ul>

<h2 id="how-does-shuffling-work">How Does Shuffling Work?</h2>
<p>Shuffling is triggered by wide transformations that aggregates data such as <code class="language-plaintext highlighter-rouge">groupByKey</code>, <code class="language-plaintext highlighter-rouge">reduceByKey</code> and joins. Narrow transformations like map and filter do not trigger a shuffle.</p>

<figure class="align-center">
  <img src="https://ivanpua.com/assets/images/optimising_spark/shuffle.png" alt="" />
  <figcaption>Phases in a shuffle </figcaption>
</figure>

<h3 id="1-map-phase">1. Map Phase</h3>
<ul>
  <li>Spark processes the data into key-value pairs for grouping, sorting, or other transformations.</li>
  <li>Example: For a <code class="language-plaintext highlighter-rouge">groupByKey</code> operation, Spark maps rows into key-value pairs (e.g., <code class="language-plaintext highlighter-rouge">user_id</code> as the key) if it’s not defined already.</li>
</ul>

<h3 id="2-shuffle-phase">2. Shuffle Phase</h3>
<ul>
  <li>Redistributes data across executors based on keys (in order to process data in parallel).</li>
  <li>Involves network I/O to transfer data between executors (and disk I/O if data exceeds memory).</li>
  <li>Spark determines partitions using a modulo operation on the key (e.g. <code class="language-plaintext highlighter-rouge">user_id</code>).</li>
  <li>Default number of partitions: 200 (<code class="language-plaintext highlighter-rouge">spark.sql.shuffle.partitions</code>).</li>
</ul>

<h3 id="3-reduce-phase">3. Reduce Phase</h3>
<ul>
  <li>Aggregates or processes shuffled data within each partition.</li>
  <li>Example: For <code class="language-plaintext highlighter-rouge">groupByKey</code>, Spark groups rows by key (e.g. <code class="language-plaintext highlighter-rouge">user_id</code>) and applies aggregations like <code class="language-plaintext highlighter-rouge">SUM</code>.</li>
</ul>

<h2 id="handling-skew-in-spark">Handling Skew in Spark</h2>

<p>Data skew occurs when some partitions hold significantly more data than others, leading to performance bottlenecks. Symptoms include long job runtimes, high CPU utilization (e.g. stuck at 99%), or outliers in partition sizes. <a href="https://aws.amazon.com/blogs/big-data/detect-and-handle-data-skew-on-aws-glue/">You can also detect skew by checking the summary metrics and identifying which tasks take the longest in the Spark UI</a>. A more scientific way to detect skew is to use a box and whisker plot to check for outliers. Here are some methods to reduce skew.</p>

<h3 id="for-spark-30">For Spark 3.0+:</h3>
<ul>
  <li>Enable Adaptive Query Execution (AQE) with <code class="language-plaintext highlighter-rouge">spark.sql.adaptive.enabled = true</code>.</li>
</ul>

<h3 id="for-spark-30-1">For Spark &lt;3.0:</h3>
<ul>
  <li>Use Salting:
    <ul>
      <li>Add a random “salt” column to the dataset before grouping to distribute data more evenly across partitions.</li>
      <li>Example:
        <div class="language-python highlighter-rouge"><div class="highlight"><pre class="highlight"><code><span class="n">df</span><span class="p">.</span><span class="n">withColumn</span><span class="p">(</span><span class="s">"salt_random_column"</span><span class="p">,</span> <span class="p">(</span><span class="n">rand</span> <span class="o">*</span> <span class="n">n</span><span class="p">).</span><span class="n">cast</span><span class="p">(</span><span class="n">IntegerType</span><span class="p">))</span>
  <span class="p">.</span><span class="n">groupBy</span><span class="p">(</span><span class="n">groupByFields</span><span class="p">,</span> <span class="s">"salt_random_column"</span><span class="p">)</span>
  <span class="p">.</span><span class="n">agg</span><span class="p">(</span><span class="n">aggFields</span><span class="p">)</span>
  <span class="p">.</span><span class="n">groupBy</span><span class="p">(</span><span class="n">groupByFields</span><span class="p">)</span>
  <span class="p">.</span><span class="n">agg</span><span class="p">(</span><span class="n">aggFields</span><span class="p">)</span>
</code></pre></div>        </div>
      </li>
      <li>Note: For metrics like <code class="language-plaintext highlighter-rouge">AVG</code>, decompose into <code class="language-plaintext highlighter-rouge">SUM</code> and <code class="language-plaintext highlighter-rouge">COUNT</code> before dividing.</li>
    </ul>
  </li>
</ul>

<h3 id="filter-outliers">Filter Outliers</h3>
<ul>
  <li>Identify and process outliers separately to reduce skew.</li>
</ul>

<h2 id="tips-for-optimizing-shuffling">Tips for Optimizing Shuffling:</h2>
<ol>
  <li>Avoid shuffling large datasets whenever possible; aim for tables &lt;100GB.</li>
  <li>To change the number of partitions, please use <code class="language-plaintext highlighter-rouge">spark.sql.shuffle.partitions</code>. It is linked to <code class="language-plaintext highlighter-rouge">spark.default.parallelism</code> (used in the RDD API, which is lower-level).</li>
  <li>Use <code class="language-plaintext highlighter-rouge">explain()</code> to inspect join strategies and execution plans.</li>
</ol>]]></content><author><name>Ivan</name></author><category term="data-engineering" /><category term="data-engineering" /><summary type="html"><![CDATA[Learn the basics of Spark's query execution, including joins, shuffling, and how to handle data skew effectively.]]></summary></entry><entry><title type="html">Query Engines</title><link href="https://ivanpua.com/data-engineering/query-engines/" rel="alternate" type="text/html" title="Query Engines" /><published>2025-01-25T11:00:00+11:00</published><updated>2025-01-25T11:00:00+11:00</updated><id>https://ivanpua.com/data-engineering/query-engines</id><content type="html" xml:base="https://ivanpua.com/data-engineering/query-engines/"><![CDATA[<h2 id="what-are-query-engines">What are Query Engines?</h2>

<p>A query engine is a software system that processes and executes queries, typically written in a query language like SQL, to retrieve, manipulate, or analyze data from databases or other data storage systems. It abstracts the complexity of data retrieval, providing users with a simpler way to access and interact with data.</p>

<p>A query engine performs the following steps in sequence:</p>

<ol>
  <li>Parses the query (e.g. SQL).</li>
  <li>Validates its syntax and raises any errors.</li>
  <li>Optimizes the query for performance.</li>
  <li>Creates an efficient execution plan.</li>
  <li>Executes the query against the underlying data sources.</li>
  <li>Translates the query into actions that access and process the data.</li>
  <li>Formats the query output and delivers results back to the user.</li>
</ol>

<h2 id="types-of-query-engines">Types of Query Engines</h2>

<h3 id="sql-based-engines">SQL-based Engines</h3>
<ul>
  <li>Designed to process SQL queries (e.g. MySQL, PostgreSQL, Presto, Hive, Spark SQL).</li>
  <li>Commonly used for structured data in relational databases or data warehouses.</li>
  <li>Most traditional relational database management systems (RDBMS), like MySQL, PostgreSQL, and Oracle, have built-in query engines.</li>
</ul>

<h3 id="distributed-query-engines">Distributed Query Engines</h3>
<ul>
  <li>Process queries across multiple nodes or servers to achieve scalability and high performance (e.g., Hive, Presto, Spark SQL).</li>
  <li>Often used for big data processing, such as feature engineering for machine learning models.</li>
</ul>

<h3 id="search-query-engines-or-search-engines">Search Query Engines (or Search Engines)</h3>
<ul>
  <li>Specialized for querying text or unstructured data (e.g., Elasticsearch, Solr).</li>
  <li>Support advanced text-based queries, such as full-text search and ranking.</li>
</ul>

<h2 id="how-is-a-query-engine-different-from-a-database">How is a Query Engine Different from a Database?</h2>

<ul>
  <li>A <strong>database</strong> includes storage, indexing, and transaction management, while the <strong>query engine</strong> focuses on how queries are processed, optimized, and executed.</li>
  <li>A query engine can work independently of a database by querying data directly from files, object stores, or other non-database sources. For example, Presto and Spark SQL can query data directly from data lakes without requiring the data to be loaded into a database.</li>
</ul>

<h2 id="comparison-of-distributed-query-engines">Comparison of Distributed Query Engines</h2>

<h3 id="hive">Hive</h3>
<ul>
  <li>Hive was the first distributed query engine in the world, developed by Facebook in 2008.</li>
  <li>Built on top of Hadoop’s MapReduce ecosystem, it provided reliability but suffered from slow performance due to high disk I/O and batch-oriented processing.</li>
</ul>

<h3 id="presto">Presto</h3>
<ul>
  <li>Presto, also created by Facebook in 2013, was designed as a faster alternative to Hive for interactive and ad-hoc SQL queries.</li>
  <li>Unlike Hive, Presto processes queries entirely in memory, offering low-latency execution.</li>
  <li>It functions as a pure query engine, reading data directly from various storage backends like HDFS, S3, and relational databases.</li>
</ul>

<h3 id="apache-spark">Apache Spark</h3>
<ul>
  <li>Apache Spark was introduced in 2014 as a general-purpose distributed computing engine.</li>
  <li>Spark SQL combines SQL querying capabilities with Spark’s broader functionality, such as machine learning, real-time streaming, and graph processing.</li>
  <li>It offers a flexible platform for both batch and stream processing, making it a versatile choice for distributed computing.</li>
</ul>

<table>
  <thead>
    <tr>
      <th>Feature</th>
      <th>Hive (built on MapReduce)</th>
      <th>Presto</th>
      <th>Spark</th>
    </tr>
  </thead>
  <tbody>
    <tr>
      <td>Processing Type</td>
      <td>Batch</td>
      <td>Interactive SQL</td>
      <td>Batch, Streaming, ML</td>
    </tr>
    <tr>
      <td>Latency</td>
      <td>High</td>
      <td>Low</td>
      <td>Low to Medium</td>
    </tr>
    <tr>
      <td>Data Storage</td>
      <td>Disk</td>
      <td>In-memory</td>
      <td>In-memory and Disk</td>
    </tr>
    <tr>
      <td>Scalability</td>
      <td>High</td>
      <td>Moderate</td>
      <td>High</td>
    </tr>
    <tr>
      <td>Ease of Use</td>
      <td>Low (requires coding)</td>
      <td>High (SQL-based)</td>
      <td>Moderate (rich APIs)</td>
    </tr>
    <tr>
      <td>Use Cases</td>
      <td>ETL, log analysis</td>
      <td>Ad-hoc analytics, dashboards</td>
      <td>ML, streaming, transformations</td>
    </tr>
    <tr>
      <td>Fault Tolerance</td>
      <td>High (via HDFS)</td>
      <td>Medium (memory-dependent)</td>
      <td>High</td>
    </tr>
  </tbody>
</table>]]></content><author><name>Ivan</name></author><category term="data-engineering" /><category term="data-engineering" /><summary type="html"><![CDATA[Discover the evolution of query engines like Hive, Presto, and Spark, and learn how they revolutionize data processing with scalability, speed, and versatility.]]></summary></entry><entry><title type="html">Creating AWS API Gateway Private Endpoints</title><link href="https://ivanpua.com/cloud/private-endpoint/" rel="alternate" type="text/html" title="Creating AWS API Gateway Private Endpoints" /><published>2024-04-28T20:30:00+10:00</published><updated>2024-04-28T20:30:00+10:00</updated><id>https://ivanpua.com/cloud/private-endpoint</id><content type="html" xml:base="https://ivanpua.com/cloud/private-endpoint/"><![CDATA[<h2 id="what-are-aws-api-gateway-private-endpoints">What are AWS API Gateway Private Endpoints?</h2>

<p>
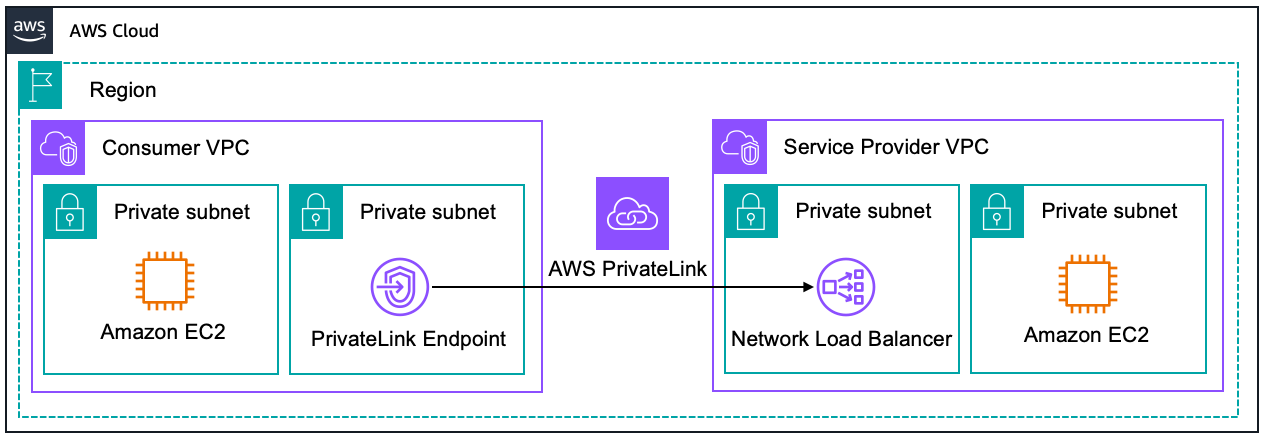
AWS API Gateway Private Endpoints is a feature of Amazon API Gateway that allows you to expose your APIs privately within your Amazon Virtual Private Cloud (VPC). This feature ensures that API traffic is confined within the AWS network, bypassing the public internet entirely. These endpoints are made possible through the integration of API Gateway with <a href="https://docs.aws.amazon.com/whitepapers/latest/aws-vpc-connectivity-options/aws-privatelink.html">AWS PrivateLink</a>, a technology that securely connects services across different AWS accounts and VPCs without requiring public IP addresses or the need to manage firewall and route tables. With API Gateway Private Endpoints, you create private APIs that are accessible only from within your VPC or from those VPCs to which you have provided access via VPC peering, AWS Transit Gateway, or Direct Connect. Here’s a image that illustrates this behaviour:</p>

<figure class="align-center">
  <img src="https://ivanpua.com/assets/images/private_endpoints/aws-privatelink.png" alt="" />
  <figcaption>By creating a AWS API Gateway Private Endpoint with PrivateLink (left side of diagram), we could allow access to or from another VPC </figcaption>
</figure>

<p>API Gateway Private Endpoints are important because they ensure that sensitive API traffic is not exposed over the internet. This is crucial for businesses operating under strict regulatory requirements, as it minimizes the risk of data breaches and unauthorized access. Moreover, keeping traffic internal reduces latency and potential exposure points, contributing to both performance and security improvements.</p>

<p>For example, consider a financial services company that operates within a tightly regulated industry. They need to process confidential financial transactions and must ensure that all data handling complies with industry regulations such as PCI-DSS or GDPR. By using API Gateway Private Endpoints, they can route all their API traffic through the private network of their Amazon Virtual Private Cloud (VPC), significantly reducing the risk of data exposure and enabling compliance with these regulatory requirements. This setup not only secures the data but also often improves the response times of the APIs by minimizing the distance data travels.</p>

<p>To learn more about the evolution of private endpoints in AWS, refer to this <a href="https://aws.amazon.com/blogs/compute/introducing-amazon-api-gateway-private-endpoints/">AWS blog</a>.</p>

<h2 id="deploying-with-aws-cdk">Deploying with AWS CDK</h2>

<p>In the previous <a href="/cloud/iac/">post</a>, I’ve explained the benefits of deploying AWS resources progammatically with Infrastructure as Code (IaC). Therefore, I prefer deploying the AWS API Gateway Private Endpoint via AWS CDK. The code below shows how to do it in Typescript, feel free to modify the properties based on your use case.</p>

<p>I refered to this <a href="https://aws.amazon.com/blogs/compute/introducing-amazon-api-gateway-private-endpoints/">AWS blog</a> and <a href="https://docs.aws.amazon.com/cdk/api/v2/">AWS CDK documention</a> for deployment.</p>

<div class="language-typescript highlighter-rouge"><div class="highlight"><pre class="highlight"><code><span class="k">import</span> <span class="o">*</span> <span class="k">as</span> <span class="nx">cdk</span> <span class="k">from</span> <span class="dl">'</span><span class="s1">aws-cdk-lib</span><span class="dl">'</span><span class="p">;</span>
<span class="k">import</span> <span class="p">{</span> <span class="nx">Construct</span> <span class="p">}</span> <span class="k">from</span> <span class="dl">'</span><span class="s1">constructs</span><span class="dl">'</span><span class="p">;</span>
<span class="k">import</span> <span class="o">*</span> <span class="k">as</span> <span class="nx">lambda</span> <span class="k">from</span> <span class="dl">'</span><span class="s1">aws-cdk-lib/aws-lambda</span><span class="dl">'</span><span class="p">;</span>
<span class="k">import</span> <span class="o">*</span> <span class="k">as</span> <span class="nx">ec2</span> <span class="k">from</span> <span class="dl">'</span><span class="s1">aws-cdk-lib/aws-ec2</span><span class="dl">'</span><span class="p">;</span>
<span class="k">import</span> <span class="o">*</span> <span class="k">as</span> <span class="nx">dotenv</span> <span class="k">from</span> <span class="dl">"</span><span class="s2">dotenv</span><span class="dl">"</span><span class="p">;</span>
<span class="k">import</span> <span class="o">*</span> <span class="k">as</span> <span class="nx">s3</span> <span class="k">from</span> <span class="dl">'</span><span class="s1">aws-cdk-lib/aws-s3</span><span class="dl">'</span><span class="p">;</span>
<span class="k">import</span> <span class="o">*</span> <span class="k">as</span> <span class="nx">path</span> <span class="k">from</span> <span class="dl">'</span><span class="s1">path</span><span class="dl">'</span><span class="p">;</span>
<span class="k">import</span> <span class="o">*</span> <span class="k">as</span> <span class="nx">iam</span> <span class="k">from</span> <span class="dl">'</span><span class="s1">aws-cdk-lib/aws-iam</span><span class="dl">'</span><span class="p">;</span>
<span class="k">import</span> <span class="o">*</span> <span class="k">as</span> <span class="nx">apiGateway</span> <span class="k">from</span> <span class="dl">'</span><span class="s1">aws-cdk-lib/aws-apigateway</span><span class="dl">'</span><span class="p">;</span>

<span class="c1">// Stack is a logical grouping of AWS resources</span>
<span class="k">export</span> <span class="kd">class</span> <span class="nx">InfraStack</span> <span class="kd">extends</span> <span class="nx">cdk</span><span class="p">.</span><span class="nx">Stack</span> <span class="p">{</span>
  <span class="kd">constructor</span><span class="p">(</span><span class="nx">scope</span><span class="p">:</span> <span class="nx">Construct</span><span class="p">,</span> <span class="nx">id</span><span class="p">:</span> <span class="kr">string</span><span class="p">,</span> <span class="nx">props</span><span class="p">?:</span> <span class="nx">cdk</span><span class="p">.</span><span class="nx">StackProps</span><span class="p">)</span> <span class="p">{</span>
    <span class="k">super</span><span class="p">(</span><span class="nx">scope</span><span class="p">,</span> <span class="nx">id</span><span class="p">,</span> <span class="nx">props</span><span class="p">);</span>

    <span class="c1">// Creating the VPC and subnets</span>
    <span class="kd">const</span> <span class="nx">vpc</span> <span class="o">=</span> <span class="k">new</span> <span class="nx">ec2</span><span class="p">.</span><span class="nx">Vpc</span><span class="p">(</span><span class="k">this</span><span class="p">,</span> <span class="dl">"</span><span class="s2">myVPC</span><span class="dl">"</span><span class="p">,</span> <span class="p">{</span>
      <span class="na">vpcName</span><span class="p">:</span> <span class="dl">"</span><span class="s2">myVPC</span><span class="dl">"</span><span class="p">,</span>
      <span class="na">ipAddresses</span><span class="p">:</span> <span class="nx">ec2</span><span class="p">.</span><span class="nx">IpAddresses</span><span class="p">.</span><span class="nx">cidr</span><span class="p">(</span><span class="dl">'</span><span class="s1">10.0.0.0/16</span><span class="dl">'</span><span class="p">),</span>
      <span class="na">availabilityZones</span><span class="p">:</span> <span class="p">[</span><span class="dl">"</span><span class="s2">ap-southeast-2a</span><span class="dl">"</span><span class="p">,</span> <span class="dl">"</span><span class="s2">ap-southeast-2b</span><span class="dl">"</span><span class="p">],</span> 
      <span class="na">enableDnsHostnames</span><span class="p">:</span> <span class="kc">true</span><span class="p">,</span>
      <span class="na">enableDnsSupport</span><span class="p">:</span> <span class="kc">true</span><span class="p">,</span>
      
      <span class="na">subnetConfiguration</span><span class="p">:</span> <span class="p">[</span>
        <span class="p">{</span>
          <span class="na">name</span><span class="p">:</span> <span class="dl">"</span><span class="s2">private-subnet</span><span class="dl">"</span><span class="p">,</span>
          <span class="na">subnetType</span><span class="p">:</span> <span class="nx">ec2</span><span class="p">.</span><span class="nx">SubnetType</span><span class="p">.</span><span class="nx">PRIVATE_ISOLATED</span><span class="p">,</span>
          <span class="na">cidrMask</span><span class="p">:</span> <span class="mi">20</span><span class="p">,</span>
        <span class="p">}</span>
      <span class="p">],</span>

    <span class="p">});</span>
    
    <span class="c1">// Creating the VPC Endpoint to Execute the API</span>
    <span class="kd">const</span> <span class="nx">vpcEndpoint</span> <span class="o">=</span> <span class="k">new</span> <span class="nx">ec2</span><span class="p">.</span><span class="nx">InterfaceVpcEndpoint</span><span class="p">(</span><span class="k">this</span><span class="p">,</span> <span class="dl">'</span><span class="s1">VPC Endpoint</span><span class="dl">'</span><span class="p">,</span> <span class="p">{</span>
      <span class="nx">vpc</span><span class="p">,</span>
      <span class="na">service</span><span class="p">:</span> <span class="k">new</span> <span class="nx">ec2</span><span class="p">.</span><span class="nx">InterfaceVpcEndpointService</span><span class="p">(</span><span class="dl">'</span><span class="s1">com.amazonaws.ap-southeast-2.execute-api</span><span class="dl">'</span><span class="p">),</span>
      <span class="na">privateDnsEnabled</span><span class="p">:</span> <span class="kc">true</span><span class="p">,</span>
      <span class="c1">// Choose which availability zones to place the VPC endpoint in, based on</span>
      <span class="c1">// available AZs</span>
      <span class="na">subnets</span><span class="p">:</span> <span class="p">{</span>
        <span class="na">availabilityZones</span><span class="p">:</span> <span class="p">[</span><span class="dl">'</span><span class="s1">ap-southeast-2a</span><span class="dl">'</span><span class="p">,</span> <span class="dl">'</span><span class="s1">ap-southeast-2b</span><span class="dl">'</span><span class="p">]</span>
      <span class="p">}</span>
    <span class="p">});</span>

    <span class="c1">// Create a S3 bucket for VPC Flow Logs - important for debugging. </span>
    <span class="kd">const</span> <span class="nx">logsBucket</span> <span class="o">=</span> <span class="k">new</span> <span class="nx">s3</span><span class="p">.</span><span class="nx">Bucket</span><span class="p">(</span><span class="k">this</span><span class="p">,</span> <span class="dl">"</span><span class="s2">myLogs</span><span class="dl">"</span><span class="p">,</span> <span class="p">{</span>
      <span class="na">bucketName</span><span class="p">:</span> <span class="dl">'</span><span class="s1">my-logs</span><span class="dl">'</span><span class="p">,</span>
      <span class="na">blockPublicAccess</span><span class="p">:</span> <span class="nx">s3</span><span class="p">.</span><span class="nx">BlockPublicAccess</span><span class="p">.</span><span class="nx">BLOCK_ALL</span><span class="p">,</span>
      <span class="na">enforceSSL</span><span class="p">:</span> <span class="kc">true</span><span class="p">,</span>
      <span class="na">accessControl</span><span class="p">:</span> <span class="nx">s3</span><span class="p">.</span><span class="nx">BucketAccessControl</span><span class="p">.</span><span class="nx">LOG_DELIVERY_WRITE</span><span class="p">,</span>
      <span class="na">encryption</span><span class="p">:</span> <span class="nx">s3</span><span class="p">.</span><span class="nx">BucketEncryption</span><span class="p">.</span><span class="nx">S3_MANAGED</span><span class="p">,</span>
      <span class="na">intelligentTieringConfigurations</span><span class="p">:</span> <span class="p">[</span>
        <span class="p">{</span>
          <span class="na">name</span><span class="p">:</span> <span class="dl">"</span><span class="s2">archive</span><span class="dl">"</span><span class="p">,</span>
          <span class="na">archiveAccessTierTime</span><span class="p">:</span> <span class="nx">cdk</span><span class="p">.</span><span class="nx">Duration</span><span class="p">.</span><span class="nx">days</span><span class="p">(</span><span class="mi">90</span><span class="p">),</span>
          <span class="na">deepArchiveAccessTierTime</span><span class="p">:</span> <span class="nx">cdk</span><span class="p">.</span><span class="nx">Duration</span><span class="p">.</span><span class="nx">days</span><span class="p">(</span><span class="mi">180</span><span class="p">),</span>
        <span class="p">},</span>
      <span class="p">],</span>
    <span class="p">})</span>

    <span class="kd">const</span> <span class="nx">vpcFlowLogRole</span> <span class="o">=</span> <span class="k">new</span> <span class="nx">iam</span><span class="p">.</span><span class="nx">Role</span><span class="p">(</span><span class="k">this</span><span class="p">,</span> <span class="dl">"</span><span class="s2">vpcFlowLogRole</span><span class="dl">"</span><span class="p">,</span> <span class="p">{</span>
      <span class="na">assumedBy</span><span class="p">:</span> <span class="k">new</span> <span class="nx">iam</span><span class="p">.</span><span class="nx">ServicePrincipal</span><span class="p">(</span><span class="dl">"</span><span class="s2">vpc-flow-logs.amazonaws.com</span><span class="dl">"</span><span class="p">),</span>
    <span class="p">})</span>

    <span class="nx">logsBucket</span><span class="p">.</span><span class="nx">grantWrite</span><span class="p">(</span><span class="nx">vpcFlowLogRole</span><span class="p">,</span> <span class="dl">"</span><span class="s2">vpcFlowLogs/*</span><span class="dl">"</span><span class="p">)</span>
    
    <span class="c1">// Direct flow logs to S3.</span>
    <span class="kd">const</span> <span class="nx">vpcFlowLogs</span> <span class="o">=</span> <span class="k">new</span> <span class="nx">ec2</span><span class="p">.</span><span class="nx">FlowLog</span><span class="p">(</span><span class="k">this</span><span class="p">,</span> <span class="dl">"</span><span class="s2">vpcFlowLogs</span><span class="dl">"</span><span class="p">,</span> <span class="p">{</span>
      <span class="na">destination</span><span class="p">:</span> <span class="nx">ec2</span><span class="p">.</span><span class="nx">FlowLogDestination</span><span class="p">.</span><span class="nx">toS3</span><span class="p">(</span><span class="nx">logsBucket</span><span class="p">,</span> <span class="dl">"</span><span class="s2">vpcFlowLogs/</span><span class="dl">"</span><span class="p">),</span>
      <span class="na">trafficType</span><span class="p">:</span> <span class="nx">ec2</span><span class="p">.</span><span class="nx">FlowLogTrafficType</span><span class="p">.</span><span class="nx">ALL</span><span class="p">,</span>
      <span class="na">flowLogName</span><span class="p">:</span> <span class="dl">"</span><span class="s2">vpcFlowLogs</span><span class="dl">"</span><span class="p">,</span>
      <span class="na">resourceType</span><span class="p">:</span> <span class="nx">ec2</span><span class="p">.</span><span class="nx">FlowLogResourceType</span><span class="p">.</span><span class="nx">fromVpc</span><span class="p">(</span><span class="nx">vpc</span><span class="p">),</span>
    <span class="p">})</span>

    <span class="cm">/* *
     * Lambda Function
     * Feel free to change it as you see fit
     * For example, you might prefer to use EC2 instead of Lambda function.
     * */</span>
    <span class="kd">const</span> <span class="nx">lambda_layer_path</span> <span class="o">=</span> <span class="nx">path</span><span class="p">.</span><span class="nx">join</span><span class="p">(</span><span class="nx">__dirname</span><span class="p">,</span> <span class="dl">"</span><span class="s2">PATH_TO_CODE</span><span class="dl">"</span><span class="p">);</span>

    <span class="kd">const</span> <span class="nx">lambda_layer</span> <span class="o">=</span> <span class="k">new</span> <span class="nx">lambda</span><span class="p">.</span><span class="nx">LayerVersion</span><span class="p">(</span><span class="k">this</span><span class="p">,</span> <span class="dl">"</span><span class="s2">LambdaBaseLayer</span><span class="dl">"</span><span class="p">,</span> <span class="p">{</span>
      <span class="na">code</span><span class="p">:</span> <span class="nx">lambda</span><span class="p">.</span><span class="nx">Code</span><span class="p">.</span><span class="nx">fromAsset</span><span class="p">(</span><span class="nx">path</span><span class="p">.</span><span class="nx">join</span><span class="p">(</span><span class="nx">lambda_layer_path</span><span class="p">,</span> <span class="dl">"</span><span class="s2">layer.zip</span><span class="dl">"</span><span class="p">)),</span> 
      <span class="na">compatibleRuntimes</span><span class="p">:</span> <span class="p">[</span><span class="nx">lambda</span><span class="p">.</span><span class="nx">Runtime</span><span class="p">.</span><span class="nx">PYTHON_3_10</span><span class="p">],</span>

    <span class="p">});</span>

    <span class="kd">const</span> <span class="nx">lambdaFunction</span> <span class="o">=</span> <span class="k">new</span> <span class="nx">lambda</span><span class="p">.</span><span class="nb">Function</span><span class="p">(</span><span class="k">this</span><span class="p">,</span> <span class="dl">"</span><span class="s2">myFunction</span><span class="dl">"</span><span class="p">,</span> <span class="p">{</span>
      
      <span class="na">functionName</span><span class="p">:</span><span class="dl">"</span><span class="s2">myFunction</span><span class="dl">"</span><span class="p">,</span>
      <span class="na">runtime</span><span class="p">:</span> <span class="nx">lambda</span><span class="p">.</span><span class="nx">Runtime</span><span class="p">.</span><span class="nx">PYTHON_3_10</span><span class="p">,</span>
      <span class="na">code</span><span class="p">:</span> <span class="nx">lambda</span><span class="p">.</span><span class="nx">Code</span><span class="p">.</span><span class="nx">fromAsset</span><span class="p">(</span><span class="nx">lambda_layer_path</span><span class="p">),</span>
      <span class="na">memorySize</span><span class="p">:</span> <span class="mi">1024</span><span class="p">,</span> <span class="c1">// Set memory size to 1024MB</span>
      <span class="na">architecture</span><span class="p">:</span> <span class="nx">lambda</span><span class="p">.</span><span class="nx">Architecture</span><span class="p">.</span><span class="nx">ARM_64</span><span class="p">,</span>
      <span class="na">handler</span><span class="p">:</span> <span class="dl">"</span><span class="s2">main.handler</span><span class="dl">"</span><span class="p">,</span>
      <span class="na">timeout</span><span class="p">:</span> <span class="nx">cdk</span><span class="p">.</span><span class="nx">Duration</span><span class="p">.</span><span class="nx">seconds</span><span class="p">(</span><span class="mi">600</span><span class="p">),</span><span class="c1">// 10 minutes</span>
      <span class="na">layers</span><span class="p">:</span> <span class="p">[</span><span class="nx">lambda_layer</span><span class="p">],</span>
      <span class="na">role</span><span class="p">:</span> <span class="nx">lambdaRole</span><span class="p">,</span>
    <span class="p">});</span>

    <span class="c1">// Create a resource policy for the AWS API Gateway to only </span>
    <span class="c1">// allow the VPC endpoint to execute the API.</span>
    <span class="kd">const</span> <span class="nx">privateAPIPolicy</span> <span class="o">=</span> <span class="p">{</span>
      <span class="dl">"</span><span class="s2">Version</span><span class="dl">"</span><span class="p">:</span> <span class="dl">"</span><span class="s2">2012-10-17</span><span class="dl">"</span><span class="p">,</span>
      <span class="dl">"</span><span class="s2">Statement</span><span class="dl">"</span><span class="p">:</span> <span class="p">[</span>
        <span class="p">{</span>
          <span class="dl">"</span><span class="s2">Effect</span><span class="dl">"</span><span class="p">:</span> <span class="dl">"</span><span class="s2">Deny</span><span class="dl">"</span><span class="p">,</span>
          <span class="dl">"</span><span class="s2">Principal</span><span class="dl">"</span><span class="p">:</span> <span class="dl">"</span><span class="s2">*</span><span class="dl">"</span><span class="p">,</span>
          <span class="dl">"</span><span class="s2">Action</span><span class="dl">"</span><span class="p">:</span> <span class="dl">"</span><span class="s2">execute-api:Invoke</span><span class="dl">"</span><span class="p">,</span>
          <span class="dl">"</span><span class="s2">Resource</span><span class="dl">"</span><span class="p">:</span> <span class="p">[</span>
            <span class="dl">"</span><span class="s2">execute-api:/*</span><span class="dl">"</span>
          <span class="p">],</span>
          <span class="dl">"</span><span class="s2">Condition</span><span class="dl">"</span><span class="p">:</span> <span class="p">{</span>
            <span class="dl">"</span><span class="s2">StringNotEquals</span><span class="dl">"</span><span class="p">:</span> <span class="p">{</span>
              <span class="dl">"</span><span class="s2">aws:sourceVpc</span><span class="dl">"</span><span class="p">:</span> <span class="nx">vpc</span><span class="p">.</span><span class="nx">vpcId</span>
            <span class="p">}</span>
          <span class="p">}</span>
        <span class="p">},</span>
        <span class="p">{</span>
          <span class="dl">"</span><span class="s2">Effect</span><span class="dl">"</span><span class="p">:</span> <span class="dl">"</span><span class="s2">Allow</span><span class="dl">"</span><span class="p">,</span>
          <span class="dl">"</span><span class="s2">Principal</span><span class="dl">"</span><span class="p">:</span> <span class="dl">"</span><span class="s2">*</span><span class="dl">"</span><span class="p">,</span>
          <span class="dl">"</span><span class="s2">Action</span><span class="dl">"</span><span class="p">:</span> <span class="dl">"</span><span class="s2">execute-api:Invoke</span><span class="dl">"</span><span class="p">,</span>
          <span class="dl">"</span><span class="s2">Resource</span><span class="dl">"</span><span class="p">:</span> <span class="p">[</span>
            <span class="dl">"</span><span class="s2">execute-api:/*</span><span class="dl">"</span>
          <span class="p">],</span>
        <span class="p">}</span>
      <span class="p">]</span>
    <span class="p">}</span>
    
    <span class="kd">const</span> <span class="nx">privateAPIPolicyDocument</span> <span class="o">=</span> <span class="nx">iam</span><span class="p">.</span><span class="nx">PolicyDocument</span><span class="p">.</span><span class="nx">fromJson</span><span class="p">(</span><span class="nx">privateAPIPolicy</span><span class="p">);</span>

    <span class="c1">// Create a AWS API Gateway Private Endpoint</span>
    <span class="kd">const</span> <span class="nx">myApi</span> <span class="o">=</span> <span class="k">new</span> <span class="nx">apiGateway</span><span class="p">.</span><span class="nx">RestApi</span><span class="p">(</span><span class="k">this</span><span class="p">,</span> <span class="dl">'</span><span class="s1">ApiGateway</span><span class="dl">'</span><span class="p">,</span> <span class="p">{</span>
      <span class="na">restApiName</span><span class="p">:</span> <span class="dl">'</span><span class="s1">My API Gateway</span><span class="dl">'</span><span class="p">,</span>
      <span class="na">endpointConfiguration</span><span class="p">:</span> <span class="p">{</span>
        <span class="na">types</span><span class="p">:</span> <span class="p">[</span><span class="nx">apiGateway</span><span class="p">.</span><span class="nx">EndpointType</span><span class="p">.</span><span class="nx">PRIVATE</span><span class="p">],</span>
        <span class="na">vpcEndpoints</span><span class="p">:</span> <span class="p">[</span><span class="nx">vpcEndpoint</span><span class="p">]</span>
      <span class="p">},</span>
      <span class="na">policy</span><span class="p">:</span> <span class="nx">privateAPIPolicyDocument</span>

    <span class="p">})</span>

    <span class="c1">// Lambda Integration - user requests are passed wholsale from API Gateway to Lambda </span>
    <span class="nx">myApi</span><span class="p">.</span><span class="nx">root</span><span class="p">.</span><span class="nx">addProxy</span><span class="p">({</span>
      <span class="na">defaultIntegration</span><span class="p">:</span> <span class="k">new</span> <span class="nx">apiGateway</span><span class="p">.</span><span class="nx">LambdaIntegration</span><span class="p">(</span><span class="nx">lambdaFunction</span><span class="p">)</span>
    <span class="p">})</span>

  <span class="p">}</span>
<span class="p">}</span>
</code></pre></div></div>

<p>
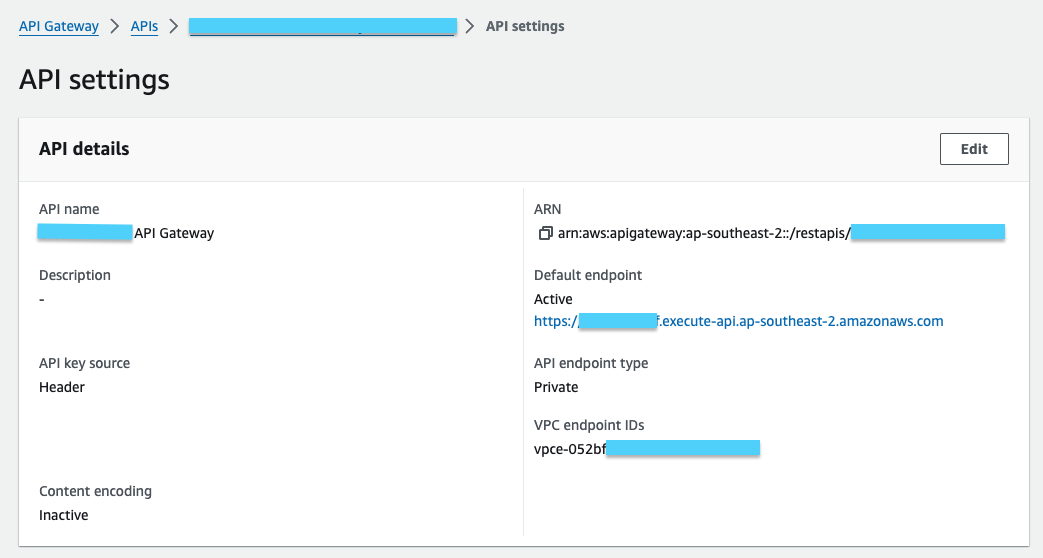
This is how the API looks like after deploying:</p>
<figure class="align-center">
  <img src="https://ivanpua.com/assets/images/private_endpoints/api.png" alt="" />
  <figcaption>AWS API Gateway Private Endpoint, within a VPC </figcaption>
</figure>

<h2 id="testing-the-private-endpoint">Testing the Private Endpoint</h2>

<p>To check if the private endpoint works, try invoking it with a Lambda function.</p>
<ol>
  <li>Create a new Lambda function with the following code</li>
</ol>

<div class="language-python highlighter-rouge"><div class="highlight"><pre class="highlight"><code><span class="kn">import</span> <span class="nn">requests</span>

<span class="c1"># Replace these global variables with your account's
</span><span class="n">VPCE_DNS_NAME</span> <span class="o">=</span> <span class="s">"yourVPCEndpoint.execute-api.ap-southeast-2.vpce.amazonaws.com"</span>
<span class="n">API_GW_ENDPOINT</span> <span class="o">=</span> <span class="s">"yourAPI.execute-api.ap-southeast-2.amazonaws.com"</span>

<span class="k">def</span> <span class="nf">lambda_handler</span><span class="p">(</span><span class="n">event</span><span class="p">,</span> <span class="n">context</span><span class="p">):</span>
    <span class="c1"># Set up the options for the HTTPS request
</span>    <span class="n">url</span> <span class="o">=</span> <span class="sa">f</span><span class="s">"https://</span><span class="si">{</span><span class="n">VPCE_DNS_NAME</span><span class="si">}</span><span class="s">/prod/"</span> <span class="c1"># Enter the path that you want to test
</span>    <span class="n">headers</span> <span class="o">=</span> <span class="p">{</span>
        <span class="s">'Host'</span><span class="p">:</span> <span class="n">API_GW_ENDPOINT</span>
    <span class="p">}</span>
    
    <span class="c1"># Make the GET request
</span>    <span class="k">try</span><span class="p">:</span>
        <span class="n">response</span> <span class="o">=</span> <span class="n">requests</span><span class="p">.</span><span class="n">get</span><span class="p">(</span><span class="n">url</span><span class="p">,</span> <span class="n">headers</span><span class="o">=</span><span class="n">headers</span><span class="p">)</span>
        <span class="c1"># Log status code and headers
</span>        <span class="k">print</span><span class="p">(</span><span class="s">'statusCode:'</span><span class="p">,</span> <span class="n">response</span><span class="p">.</span><span class="n">status_code</span><span class="p">)</span>
        <span class="k">print</span><span class="p">(</span><span class="s">'headers:'</span><span class="p">,</span> <span class="n">response</span><span class="p">.</span><span class="n">headers</span><span class="p">)</span>
        
        <span class="c1"># Return the JSON content if request was successful
</span>        <span class="c1"># print(response.json())
</span>        <span class="k">return</span> <span class="n">response</span><span class="p">.</span><span class="n">json</span><span class="p">()</span>
    
    <span class="c1"># Catch any errors that occur during the request
</span>    <span class="k">except</span> <span class="n">requests</span><span class="p">.</span><span class="n">RequestException</span> <span class="k">as</span> <span class="n">e</span><span class="p">:</span>
        <span class="k">print</span><span class="p">(</span><span class="n">e</span><span class="p">)</span>
        <span class="k">return</span> <span class="p">{</span><span class="s">'error'</span><span class="p">:</span> <span class="nb">str</span><span class="p">(</span><span class="n">e</span><span class="p">)}</span>
</code></pre></div></div>

<ol>
  <li>Ensure that the Lambda function is in the same VPC as thte Private endpoint, or at least in a VPC that is allowed as stated in the <code class="language-plaintext highlighter-rouge">privateAPIPolicyDocument</code></li>
  <li>Run a test on Lambda</li>
</ol>

<p>If the connection is successful, you will see a success message along with the JSON payload.</p>
<figure class="align-center">
  <img src="https://ivanpua.com/assets/images/private_endpoints/test_api.png" alt="" />
  <figcaption>Connection to Private Endpoint is successful! </figcaption>
</figure>]]></content><author><name>Ivan</name></author><category term="cloud" /><category term="cloud" /><category term="data-engineering" /><summary type="html"><![CDATA[Learn how AWS API Gateway Private Endpoints use AWS PrivateLink to securely expose APIs within a VPC, ensuring data stays off the public internet.]]></summary></entry><entry><title type="html">Poetry for Dependency Management</title><link href="https://ivanpua.com/data-engineering/poetry/" rel="alternate" type="text/html" title="Poetry for Dependency Management" /><published>2024-04-02T20:50:00+11:00</published><updated>2024-04-02T20:50:00+11:00</updated><id>https://ivanpua.com/data-engineering/poetry</id><content type="html" xml:base="https://ivanpua.com/data-engineering/poetry/"><![CDATA[<p>Ever struggled with Python dependency conflicts? So have I, until I discovered this tool.</p>

<p>Meet Poetry 🌟</p>

<p><a href="https://python-poetry.org/">Poetry</a> is a Python dependency management tool.</p>

<p>As I add more packages to my projects, Poetry deftly resolves any dependency conflicts—goodbye, dependency hell (yes, TensorFlow and Numpy, I’m looking at you 👀 )</p>

<p>And the best part? Poetry creates a lockfile that ensures reproducible environments across different operating systems. For instance, while I work on MacOS, I can seamlessly share my project environment with colleagues on Linux.</p>

<p>While I’ve been a fan of conda for its one-stop environment setup, I’m starting to appreciate Poetry’s reproducibility. Now, my approach for new AI projects combines the best of both worlds—conda for the Python version, and Poetry for managing everything else.</p>

<p>Here’s a list of Bash commands I run when setting up a new Python project. Feel free to incorporate them into your Makefile 😁</p>

<div class="language-bash highlighter-rouge"><div class="highlight"><pre class="highlight"><code><span class="nv">$ </span>conda create <span class="nt">-n</span> myenv <span class="nv">python</span><span class="o">=</span>3.12  <span class="c"># Create a virtual env with Conda or PyEnv</span>

<span class="nv">$ </span>pip <span class="nb">install </span>poetry <span class="c"># Install Poetry in your virtual env</span>

<span class="nv">$ </span>poetry init <span class="c"># Creates a basic pyproject.toml file in the current directory.</span>

<span class="nv">$ </span>poetry add langchain openai <span class="c"># Adds dependencies to pyproject.toml file.</span>

<span class="nv">$ </span>poetry update <span class="c"># Get and installs latest versions of dependencies, automagically.</span>
</code></pre></div></div>

<p>You could also incorporate these commands into a Makefile to save time. I like to use Makefiles as they save developer a few seconds, and it accumulates as you code longer. The code below displays my Makefile, and anyone who wants to work on this propioject could just run <code class="language-plaintext highlighter-rouge">make setup</code> and <code class="language-plaintext highlighter-rouge">make install</code>.</p>

<div class="language-make highlighter-rouge"><div class="highlight"><pre class="highlight"><code><span class="nl">setup</span><span class="o">:</span>
	<span class="p">@</span><span class="nb">echo</span> <span class="s2">"Creating a new Python environment called 'myEnv'..."</span>
	<span class="p">@</span>conda create <span class="nt">-n</span> myEnv <span class="nv">python</span><span class="o">=</span>3.12 <span class="nt">-y</span>

<span class="nl">install</span><span class="o">:</span>
	<span class="p">@</span><span class="nb">echo</span> <span class="s2">"Installing Poetry, a Python package manager..."</span>
	<span class="p">@</span>pip <span class="nb">install </span>poetry

	<span class="err">@echo</span> <span class="s2">"Installing packages with poetry..."</span>
	<span class="err">@poetry</span> <span class="err">install</span> <span class="err">--no-root</span>
</code></pre></div></div>

<p>After running this command <code class="language-plaintext highlighter-rouge">poetry add langchain openai</code>, the <code class="language-plaintext highlighter-rouge">pyproject.toml</code> file looks like this.</p>

<div class="language-toml highlighter-rouge"><div class="highlight"><pre class="highlight"><code><span class="nn">[tool.poetry]</span>
<span class="py">name</span> <span class="p">=</span> <span class="s">"projectName"</span>
<span class="py">version</span> <span class="p">=</span> <span class="s">"0.1.0"</span>
<span class="py">description</span> <span class="p">=</span> <span class="s">""</span>
<span class="py">authors</span> <span class="p">=</span> <span class="s">""</span>
<span class="py">readme</span> <span class="p">=</span> <span class="s">"README.md"</span>

<span class="nn">[tool.poetry.dependencies]</span>
<span class="py">python</span> <span class="p">=</span> <span class="s">"^3.12"</span>
<span class="py">openai</span> <span class="p">=</span> <span class="s">"^1.14.3"</span>
<span class="py">langchain</span> <span class="p">=</span> <span class="s">"^0.1.14"</span>

<span class="nn">[build-system]</span>
<span class="py">requires</span> <span class="p">=</span> <span class="nn">["poetry-core"]</span>
<span class="py">build-backend</span> <span class="p">=</span> <span class="s">"poetry.core.masonry.api"</span>
</code></pre></div></div>]]></content><author><name>Ivan</name></author><category term="data-engineering" /><category term="data-engineering" /><summary type="html"><![CDATA[Explore how Poetry manages Python dependencies and ensures reproducible setups across systems, enhancing project collaboration]]></summary></entry><entry><title type="html">I Built a SaaS Business for a Year. Here’s What I Learnt</title><link href="https://ivanpua.com/startup/saas-lessons/" rel="alternate" type="text/html" title="I Built a SaaS Business for a Year. Here’s What I Learnt" /><published>2024-01-26T09:25:00+11:00</published><updated>2024-01-26T09:25:00+11:00</updated><id>https://ivanpua.com/startup/saas-lessons</id><content type="html" xml:base="https://ivanpua.com/startup/saas-lessons/"><![CDATA[<p>In December 2022, coinciding with the launch of ChatGPT, I embarked on a mission to develop data and AI products that empower others. Since then, I have brainstormed ideas, <em>tried</em> to establish product-market fit, and constructed the product’s back end. This blog shares the learnings I wish I had known before creating a SaaS product. It aims to help aspiring entrepreneurs avoid the obstacles I encountered and accelerate their journey in launching a SaaS business.</p>

<h2 id="ideation-and-market-validation">Ideation and Market Validation</h2>

<p>If you already have a business idea, feel free to jump ahead to Tip #2. But if you’re figuring out where to start, the following advice is for you.</p>

<h3 id="tip-1-there-is-no-million-dollar-idea">Tip 1: There is No “Million-Dollar” Idea</h3>

<p>Finding the perfect problem to solve right off the bat is rare. Many successful startups pivot from their initial idea to something more viable. Instagram began as a location check-in app, while Slack originated from a gaming project named Glitch. The key is to start somewhere. If you’re struggling to identify a problem, consider these two strategies:</p>

<ul>
  <li>Address a personal pain point, something that you wish were better in your day-to-day life. For instance, I found the process of searching for recipes and buying ingredients time-consuming, but existing meal delivery services like HelloFresh were too costly. This led me to explore alternative solutions.</li>
  <li>Leverage your strengths. My expertise in Data Science and AI directed me towards using these tools to enhance marketing and sales for businesses, which became my focal point. In addition, pay attention to what resonates with your audience, especially if you have ongoing projects or a GitHub repository.</li>
</ul>

<p>I opted for the second approach to guide my direction, aiming to apply data and AI to boost sales for e-commerce founders. However, don’t stress about nailing the “perfect” problem at the start. Remember, the initial idea is merely a starting point; a launchpad. Your journey will likely involve pivots as you refine your concept.</p>

<figure class="align-center">
  <img src="https://ivanpua.com/assets/images/saas_lessons/batman.jpeg" alt="" />
  <figcaption>Don't overthink it mate</figcaption>
</figure>

<h3 id="tip-2-define-your-initial-customer-persona-icp-first">Tip 2: Define your Initial Customer Persona (ICP) first</h3>

<p>Finding the right customer is as important as solving the right problem. If your target audience isn’t aligned, even the best solutions won’t make an impact. ICP helps you pinpoint the precise niche your SaaS product should initially cater to. Your SaaS product should initially address the pain points of your most dedicated users, or your superfans. Once they are happy, you can expand your features to a wider audience. Startups have the advantage of becoming experts in a specific problem area, thereby outmaneuvering established incumbents.</p>

<p>Having an ICP also helps you narrow down the users you should interview. I made the mistake of not having a very specific ICP at the start, as a result, I interviewed a very diverse array of e-commerce founders, wasting valuable time.</p>

<p>How do you figure out your ICP? Be specific. Instead of a broad “Shopify sellers,” target “Beginner Shopify founders with annual revenues under $10K looking to boost customer acquisition through targeted ads.” Here’s a <a href="https://docs.google.com/spreadsheets/d/1DAajOv4KKm_cVMFgA694sP7mfFvieAPasWZVK_9TOcg/edit#gid=0">template</a> to kickstart your ICP definition – credits to <a href="https://www.lennysnewsletter.com/">Lenny’s Newsletter</a>.</p>

<figure class="align-center">
  <img src="https://ivanpua.com/assets/images/saas_lessons/drake.jpeg" alt="" />
  <figcaption>One of my biggest mistakes is not having a specific ICP at the start</figcaption>
</figure>

<h3 id="tip-3-talk-to-your-customers">Tip 3: Talk to your customers</h3>

<p>This is the most important tip. Want to know if you’re solving a real problem? Talk to your potential users. Time is precious, so pick your platforms to reach out to your users wisely. LinkedIn and TikTok are great for reaching B2B and B2C audiences, respectively.</p>

<p>My ICP was ‘Beginner Shopify founders with annual revenues under $10K looking to push ads and attract more customers.’ I reached out to my ICP through my network, Instagram DMs, online forum posts, Facebook groups, and pitches at startup events. This approach helped me connect with over 30 potential users, uncovering their main challenges, which includes:</p>

<ul>
  <li>Uncertainty about competitors’ marketing performance.</li>
  <li>Lack of knowledge of the most profitable marketing strategies.</li>
  <li>Difficulty identifying the target market or audience for their ads.</li>
</ul>

<p>Don’t be shy to reach out. The worst response you can get is a no.</p>

<h3 id="tip-4-how-to-talk-to-customers-mums-test">Tip 4: How to talk to customers? Mum’s test</h3>

<p>The <a href="https://www.youtube.com/watch?v=Hla1jzhan78">Mum’s Test</a> is a framework for conducting user interviews to get honest feedback. It emphasises the importance of understanding users’ challenges without hinting at solutions and advocates for active listening. Your goal should be finding out their pain points and their current workarounds – basically peeking into their life.</p>

<p>Look for strong emotional signals, such as frustration or eagerness to pay, as these can highlight significant pain points.</p>

<h2 id="building-your-product">Building Your Product</h2>

<h3 id="tip-5-keep-it-simple-stupid-kiss">Tip 5: Keep It Simple, Stupid (KISS)</h3>

<p>So you’ve validated the problem with your ICP, and you are ready to build your SaaS product. Here’s my advice: focus on building a Minimum Viable Product (MVP) that’s as simple as possible. Resist the temptation to integrate complex technologies, like Blockchain or Snowflake, unless they’re central to your offering. Simplicity means quicker development and a clearer focus on solving your users’ most pressing issues. Sometimes, your MVP can be as basic as a Python script!</p>

<figure class="align-center">
  <img src="https://ivanpua.com/assets/images/saas_lessons/jealous.jpeg" alt="" />
</figure>

<p>For my project, I initially designed an MVP with several features:</p>

<ul>
  <li>Customer segmentation and analytics</li>
  <li>Recommends platforms for publishing ads</li>
  <li>Publishes ads</li>
  <li>Tracks ad performance</li>
  <li>Creates a feedback loop for better ads</li>
</ul>

<p>In retrospect, this MVP was overly complex. A better approach would have been to focus on one key feature based on user feedback. It took some time to realize this issue, but I eventually decided to develop a customer segmentation and analytics tool – the first feature on my list.</p>

<h3 id="tip-6-talk-to-your-customers-again">Tip 6: Talk to your customers (again)</h3>

<p>After creating your MVP, demonstrate it to your customers and gather their feedback. Even better, record your demo and share it on LinkedIn – that’s a fast way to spread the word.</p>

<figure class="align-center">
  <img src="https://ivanpua.com/assets/images/saas_lessons/bernie.jpeg" alt="" />
  <figcaption>Thanks, Bernie</figcaption>
</figure>

<p>After demonstrating my MVP to over 30 users, I have observed three obvious signs that indicate if the user is interested:</p>

<ul>
  <li>They are willing to pay you money</li>
  <li>They are willing to refer you to their networks</li>
  <li>You start receiving cold inbound inquiries</li>
</ul>

<p>Here are the key user feedback for my MVP (customer segmentation and analytics tool):</p>

<ul>
  <li>A desire for customer analytics to not only display data but also provide marketing recommendations.</li>
  <li>Integration with Shopify and/or Google Analytics for data extraction.</li>
  <li>A focus on content creation over customer analytics.</li>
</ul>

<p>The last piece of feedback was interesting, and I should have paid more attention to it, as I’ll explain in the next tip.</p>

<h3 id="tip-7-embrace-the-pivot">Tip 7: Embrace the Pivot</h3>

<p>As a SaaS founder, being receptive to user feedback and ready to iterate your product is essential. Take my experience, for instance. I was testing my MVP with a beta tester—a house furnishing company with an online presence. I provided them with customer segmentation insights through a simple Google Sheets file, nothing too fancy. The feedback I received was pretty tepid; the client didn’t see the value in paying $20/month for insights they felt they already understood well. This lukewarm response was a wake-up call – it drove me to revisit and refine my product. It’s important to remember that it’s rare to get everything perfect on the first try, and that’s perfectly fine. Each iteration is a step closer to success.</p>

<h3 id="bonus-tip-join-a-community">Bonus Tip: Join a Community</h3>

<p>Building a SaaS product from scratch is tough. There are times when, as a founder, you might feel like giving up and retreating to your comfort zone. However, being part of a community of like-minded individuals can keep you going. Communities offer various benefits. They keep you accountable, provide a platform to exchange ideas and remind you that you’re not alone in this journey.</p>

<p>If you are based in Australia, I highly recommend <a href="https://www.nextchapter.to/">Next Chapter</a> and <a href="https://www.thebuilderclub.org/">The Builders Club</a>.</p>

<h2 id="conclusion">Conclusion</h2>

<p>I’m currently developing a customer segmentation tool for e-commerce entrepreneurs, offering them actionable insights. I plan to launch this tool soon to start building traction. My next blog post will explore the technical architecture, so stay tuned.</p>

<p>Remember, building a startup is a journey, not a destination. Embrace the process and enjoy the adventure 🌱</p>]]></content><author><name>Ivan</name></author><category term="startup" /><category term="startup" /><category term="llm" /><summary type="html"><![CDATA[Explore the journey of building AI-driven SaaS products for e-commerce, offering essential insights and strategies for aspiring tech entrepreneurs in the dynamic digital marketplace]]></summary></entry><entry><title type="html">Auto-GPT is overhyped.</title><link href="https://ivanpua.com/generative-ai/autogpt/" rel="alternate" type="text/html" title="Auto-GPT is overhyped." /><published>2023-04-17T19:12:00+10:00</published><updated>2023-04-17T19:12:00+10:00</updated><id>https://ivanpua.com/generative-ai/autogpt</id><content type="html" xml:base="https://ivanpua.com/generative-ai/autogpt/"><![CDATA[<h2 id="auto-gpt-explained-in-2-seconds">Auto-GPT: Explained in 2 seconds</h2>

<p>Auto-GPT utilizes OpenAI’s API to autonomously perform tasks like writing a blog or creating a website from scratch. The creators of Auto-GPT <a href="https://news.agpt.co/#about">aim</a> to make it the best autonomous AI assistant for every device and person, think J.A.R.V.I.S. from Iron Man.</p>

<h2 id="how-it-works">How it works</h2>

<p>To use Auto-GPT, you simply type what you want it to do in the terminal and it breaks down the task into a to-do list. For example, you could ask it to be “an autonomous agent that leverages data to provide expert marketing recommendations based on customer segments and their attributes.” The subtasks that it generates are visible in the image below.</p>

<figure class="align-center">
  <img src="https://ivanpua.com/assets/images/autogpt/autogpt-hi.png" alt="" />
  <figcaption>Asking Auto-GPT to become an data-driven marketing expert</figcaption>
</figure>

<p>Compared to ChatGPT, Auto-GPT is more capable because it can access the Google search engine to perform various tasks. It also supports several third-party plugins, although I haven’t used them.</p>

<h2 id="why-auto-gpt-is-overhyped">Why Auto-GPT is overhyped</h2>

<h3 id="1-repetitive">1. Repetitive</h3>

<p>Auto-GPT often becomes repetitive by recommending different solutions to fix the same problem. While this is similar to how humans think, as we explore multiple methods, it can be annoying, especially if the problem is simple.  For example, one of the subtasks is to execute a Python file called <code class="language-plaintext highlighter-rouge">customer_data_analysis.py</code>, but it keeps encountering the same error: <code class="language-plaintext highlighter-rouge">pandas module not found.</code> Any software engineer would tell you to run <code class="language-plaintext highlighter-rouge">pip install pandas</code> to solve the problem, but Auto-GPT proceeds to Google “how to install pandas module” compile those instructions, and yet fails to run the command. As a result, the same error reappears.</p>

<figure class="align-center">
  <img src="https://ivanpua.com/assets/images/autogpt/autogpt-blur.png" alt="" />
  <figcaption>Auto-GPT going around in circles just to install pandas Python module</figcaption>
</figure>

<h3 id="2-costly">2. Costly</h3>

<p>This brings us to the second point: the back-and-forth between Auto-GPT and the same error can consume a lot of cost, particularly when using GPT-4.</p>

<p>In my opinion, Auto-GPT represents a promising initial stride towards full autonomy. However, it still has a considerable distance to cover before it can truly be regarded as “intelligent”. Given the fast-paced nature of the AI industry, I would recommend that anyone seeking to avoid falling for overhyped AI trends and tools adopt a critical mindset and concentrate on the underlying technology, rather than being swayed by buzzwords or flashy Twitter videos.</p>]]></content><author><name>Ivan</name></author><category term="generative-ai" /><category term="generative-ai" /><category term="llm" /><summary type="html"><![CDATA[Auto-GPT utilizes OpenAI's API to perform tasks autonomously but can be overhyped due to its repetitive nature and high cost.]]></summary></entry><entry><title type="html">Large Language Models - A Primer</title><link href="https://ivanpua.com/generative-ai/llm-primer/" rel="alternate" type="text/html" title="Large Language Models - A Primer" /><published>2023-04-17T19:12:00+10:00</published><updated>2023-04-17T19:12:00+10:00</updated><id>https://ivanpua.com/generative-ai/llm-primer</id><content type="html" xml:base="https://ivanpua.com/generative-ai/llm-primer/"><![CDATA[<h2 id="two-second-summary">Two-second Summary</h2>
<p>Large Language Models (LLMs) are artificial intelligence systems that can analyze, understand, and generate human language. These models are designed to learn the patterns and structures of natural language by processing vast amounts of text data.</p>

<h2 id="brief-history-of-llm">Brief history of LLM</h2>
<ul>
  <li>In 2012, researchers at the University of Toronto and Google developed the first neural language model, called Word2Vec. It was able to learn word embeddings that could capture the semantic relationships between words. This was a major breakthrough in the field and it paved the way for the development of larger and more complex language models.</li>
  <li>In 2018, Google developed BERT, a large pre-trained language model. BERT has achieved state-of-the-art results on many NLP benchmarks, and it has been used for a variety of NLP tasks, including sentiment analysis, named entity recognition, and question answering. The main challenge with BERT models is because it is a complex model with millions of parameters, training this model requires considerable data and computational power, resulting in high costs and time consumption.</li>
  <li>The same year, researchers at OpenAI developed the first GPT (Generative Pre-trained Transformer) model, which was able to generate human-like text and perform a wide range of NLP tasks with high accuracy.</li>
</ul>

<h3 id="gpt-vs-bert">GPT vs BERT</h3>
<p>The primary difference between GPT family models and BERT lies in their architectures, training data, and objectives. For instance, BERT is designed to perform specific tasks, such as sentiment analysis, language translation, or speech recognition, meaning that it can be trained on a smaller dataset to perform a specific language-based task with high accuracy. On the other hand, GPT is trainred on a large corpus of publicly available data, hence it is more suitable for tasks that require generating coherent and meaningful language, such as holding a conversation and content creation.</p>

<h2 id="chatgpt">ChatGPT</h2>
<p>ChatGPT, developed by OpenAI, has gained immense popularity due to its exceptional conversational abilities. It has been trained on a wide range of conversational text, and fine-tuned to excel at tasks such as question answering and dialogue generation. Furthermore, its user-friendly interface makes it highly versatile and adaptable to various use cases, even beyond developers.</p>

<p>One of the most remarkable features of ChatGPT is its ability to generate human-like responses. This is primarily due to its use of reinforcement learning from human feedback (RLHF). ChatGPT employs this technique to rank the responses generated by the initial model and learn from human rankings to select the best human-like response, resulting in more natural and coherent conversations.</p>

<h2 id="use-cases">Use Cases</h2>

<table>
  <thead>
    <tr>
      <th>For Corporations</th>
      <th>For individuals</th>
      <th> </th>
      <th> </th>
      <th> </th>
    </tr>
  </thead>
  <tbody>
    <tr>
      <td>Chatbots that are more   personalised</td>
      <td>Text summarization   and generation</td>
      <td> </td>
      <td> </td>
      <td> </td>
    </tr>
    <tr>
      <td>Integration with existing work   applications (e.g. Slack, G-Drive)</td>
      <td>Grammar   correction</td>
      <td> </td>
      <td> </td>
      <td> </td>
    </tr>
    <tr>
      <td>Accelerate content creation and   customer personalisation</td>
      <td>Explain   difficult concepts like I’m 5, or a PhD student</td>
      <td> </td>
      <td> </td>
      <td> </td>
    </tr>
    <tr>
      <td>Email classification,   summarisation and automated response</td>
      <td>Translate   text too different languages</td>
      <td> </td>
      <td> </td>
      <td> </td>
    </tr>
    <tr>
      <td>Enhance team productivity and   creativity, for instance generate meeting agenda.</td>
      <td>Write and   explain code, and even translate to another coding language</td>
      <td> </td>
      <td> </td>
      <td> </td>
    </tr>
    <tr>
      <td>Create new text-based products</td>
      <td>Turn a   product description to an ad copy</td>
      <td> </td>
      <td> </td>
      <td> </td>
    </tr>
    <tr>
      <td> </td>
      <td>Integration   with 3rd party apps – the possibilities are endless!</td>
      <td> </td>
      <td> </td>
      <td> </td>
    </tr>
  </tbody>
</table>

<h2 id="model-architecture-of-chatgpt">Model Architecture of ChatGPT</h2>

<p>ChatGPT belongs to the GPT family of language models. Let’s zoom in on GPT-3, which comprises an encoder, attention layers, a feedforward network, a decoder, and a softmax layer. To achieve its impressive language generation capabilities, GPT-3 uses causal language modeling. This means that the model predicts the next token in a sequence of tokens, with a constraint that it can only attend to tokens on the left. Here are the steps involved by ChatGPT to generate text:</p>

<figure class="align-center">
  <img src="https://ivanpua.com/assets/images/llm_primer/fullarch.png" alt="" />
  <figcaption>GPT's architecture <a href="https://dugas.ch/artificial_curiosity/GPT_architecture.html#paper2">[Reference]</a></figcaption>
</figure>

<ol>
  <li>The input sequence for GPT-3 is fixed at 2048 words, but shorter sequences can still be used by filling the extra positions with “empty” values.</li>
  <li>To encode the input sequence, the encoder first converts it into a one-hot vector and then compresses it into a smaller dimensional space called an embedding vector to save space.</li>
  <li>Meanwhile, GPT-3 also encodes the position of each token in the sequence, but does not reduce its size to form an embedding.</li>
  <li>The position encodings and input embeddings are combined into a single matrix, which is then fed into the attention layers.</li>
  <li>In simple terms, the attention layer predicts which input tokens to focus on and how much for each output in the sequence. The input matrix is transformed into three separate matrices - queries, keys, and values - and matrix manipulations are performed among them to select the most important token.</li>
  <li>This process is repeated 96 times in GPT, which is why it is called multi-head attention.</li>
  <li>The output of the attention layers is then passed into a feed-forward block in a multi-layer perceptron.</li>
  <li>The resulting matrix contains, for each of the 2048 output positions in the sequence, a 12288-vector of information about which word should appear. To generate text, this matrix is decoded using a “decoder”.</li>
  <li>When GPT-3 generates text, it doesn’t just provide a single guess for the next word. Instead, it generates a sequence of guesses - one for each of the 2048 “next” positions in the sequence - with each guess representing the probability of a likely word.</li>
</ol>

<h2 id="limitation-of-chatgpt">Limitation of ChatGPT</h2>
<ul>
  <li><strong>Hallucination</strong> - ChatGPT can generate highly creative but potentially inaccurate information, and therefore should not be used for decision-making without human involvement. Although the AI model is continuously improving, it cannot understand cause and effect, reason like a human, or produce sensible moves in games like chess. It is a useful tool for ideation and creativity, but critical thinking and validation should remain the responsibility of humans. The output of ChatGPT is not a reliable source of factual information and should not be used without human supervision.</li>
  <li><strong>Data security and privacy</strong> - Studies have demonstrated that large models like ChatGPT can be vulnerable to privacy intrusion issues, where personally identifiable information (PII) can be extracted from training data using specific prompts or code. As such, businesses must carefully consider data security and privacy concerns when incorporating this technology into their operations. Protecting sensitive information and customer privacy should be a top priority, and guardrails should be established to reduce potential risks.</li>
  <li><strong>Fairness and Inclusiveness</strong> - Internet-scale systems are prone to bias, which can have unintended negative consequences for minority groups, such as perpetuating bias in algorithms and increasing error rates in facial recognition. Additionally, the digital divide may prevent minority groups from accessing the benefits of technological advancements. As a result, it is important to develop and deploy new technologies responsibly and equitably. While ChatGPT uses a Moderation API to block unsafe content, it may not effectively address the propagation of unfairness and bias within the system.</li>
</ul>

<h2 id="recent-trends-as-of-april-2023">Recent Trends (as of April 2023)</h2>
<ul>
  <li>Microsoft has invested $10 billion in OpenAI and recently released their latest conversational AI solution, the Bing chatbot. Unlike ChatGPT, which can only retrieve information up until 2022 based on the data it was trained on, “the new Bing” is able to retrieve information about recent news and events.</li>
  <li>In mid-March, OpenAI announced their latest breakthrough - the GPT-4 model. GPT-4 is able to handle more complex conversational tasks compared to ChatGPT. The new model is versatile and can accept images as input as well as text.</li>
  <li>Google has its own conversational AI system called BARD, and they have released the PaLM API.</li>
  <li>Meta released LLaMA, a smaller and more performant model compared to ChatGPT. They intend to grant access to users on a case–by-case basis.</li>
  <li>Amazon has introduced a cloud service called Bedrock that developers can use to enhance their software with artificial intelligence systems that can generate text. Through its Bedrock generative AI service, AWS will offer access to its own first-party language models called Titan, and a model for turning text into images from startup Stability AI.</li>
</ul>

<h3 id="segue---prompt-engineering">Segue - Prompt engineering</h3>
<p>Prompt engineering is the process of designing and refining prompts to guide generative AI systems, particularly in language and image models. It is crucial for achieving high-quality results, but can be challenging and time-consuming. Prompt engineering is becoming more popular due to the increasing demand for generative AI applications, and some creators are already offering their prompts on marketplaces like PromptBase. However, there are concerns that people may overestimate the technical rigor and reliability of results obtained from a constantly evolving black box. Crafting appropriate prompts requires meticulous exploration of possibilities and figuring out why and when AI produces inaccurate results. The field of prompt engineering is evolving, and new strategies and techniques may become necessary to keep pace with emerging trends and challenges. Despite limitations, the potential benefits of these technologies are vast and far-reaching.</p>

<p>Stay tuned for more content on Large Language Models!</p>]]></content><author><name>Ivan</name></author><category term="generative-ai" /><category term="generative-ai" /><category term="llm" /><summary type="html"><![CDATA[A informative and easy to understand summary on large language models, particularly ChatGPT]]></summary></entry><entry><title type="html">Creating an endpoint on AWS Sagemaker with Pulumi</title><link href="https://ivanpua.com/cloud/pulumi-endpoint/" rel="alternate" type="text/html" title="Creating an endpoint on AWS Sagemaker with Pulumi" /><published>2023-04-01T19:07:00+11:00</published><updated>2023-04-01T19:07:00+11:00</updated><id>https://ivanpua.com/cloud/pulumi-endpoint</id><content type="html" xml:base="https://ivanpua.com/cloud/pulumi-endpoint/"><![CDATA[<p>In the previous <a href="/cloud/iac/">post</a>, I mentioned Pulumi - an emerging open-source IaC tool. To further understand Pulumi’s functionalities, I have used Pulumi to create a real-time endpoint to serve a machine learning (ML) model on AWS Sagemaker, and now I would like to walk you through the steps involved.</p>

<p>In this blog post, we will cover everything from setting up the necessary infrastructure to provisioning endpoints with industry’s best practices. By the end of this post, you will have a good understanding of how to use Pulumi and SageMaker together to manage your machine learning models like a pro. So, let’s dive in!</p>

<p>Prerequisites:</p>
<ul>
  <li>An active AWS account with developer permissions</li>
  <li>A new Pulumi project with your AWS configuration.</li>
  <li>A ML model created on AWS</li>
</ul>

<p>To create an endpoint, 3 resources are required, namely S3 bucket, endpoint configuration, and endpoint. In addition, CloudWatch log group resource is a good to have. We will explain the details further below.</p>

<h2 id="s3-bucket">S3 Bucket</h2>
<p>This is needed to store your endpoint e.g. input data from users, output predictions etc.</p>

<figure class="highlight"><pre><code class="language-python" data-lang="python"><span class="kn">import</span> <span class="nn">pulumi_aws</span> <span class="k">as</span> <span class="n">aws</span>

<span class="n">s3_bucket</span> <span class="o">=</span> <span class="n">aws</span><span class="p">.</span><span class="n">s3</span><span class="p">.</span><span class="n">Bucket</span><span class="p">(</span>
    <span class="n">resource_name</span><span class="o">=</span><span class="s">"endpoint-bucket"</span><span class="p">,</span>
    <span class="n">bucket</span><span class="o">=</span><span class="s">"endpoint-bucket"</span><span class="p">,</span>
    <span class="n">acl</span><span class="o">=</span><span class="s">"private"</span><span class="p">,</span>
<span class="p">)</span></code></pre></figure>

<h2 id="endpoint-configuration">Endpoint Configuration</h2>

<p>It is highly recommended to enable data capture to record information that can be used for training, debugging, and monitoring model. Amazon SageMaker Model Monitor automatically parses this captured data and compares metrics from this data with a baseline that you create for the model, which is useful for detecting model and data drift. For more information, refer to this <a href="https://www.youtube.com/watch?v=J9T0X9Jxl_w&amp;ab_channel=AWSEvents">video</a>.</p>

<figure class="highlight"><pre><code class="language-python" data-lang="python"><span class="n">s3_uri</span> <span class="o">=</span> <span class="sa">f</span><span class="s">"s3://endpoint-bucket/endpoint-data-capture-logs/"</span> <span class="c1"># from s3 bucket created previously
</span><span class="n">endpoint_configuration</span> <span class="o">=</span> <span class="n">aws</span><span class="p">.</span><span class="n">sagemaker</span><span class="p">.</span><span class="n">EndpointConfiguration</span><span class="p">(</span>
    <span class="n">resource_name</span><span class="o">=</span><span class="n">model_name</span><span class="p">,</span>
    <span class="n">name</span><span class="o">=</span><span class="n">model_name</span><span class="p">,</span>
    <span class="n">data_capture_config</span><span class="o">=</span><span class="n">aws</span><span class="p">.</span><span class="n">sagemaker</span><span class="p">.</span><span class="n">EndpointConfigurationDataCaptureConfigArgs</span><span class="p">(</span>
        <span class="n">destination_s3_uri</span><span class="o">=</span><span class="n">s3_uri</span><span class="p">,</span>
        <span class="n">initial_sampling_percentage</span><span class="o">=</span><span class="mi">100</span><span class="p">,</span> <span class="c1"># A lower value is recommended for Endpoints with high traffic.
</span>        <span class="n">enable_capture</span><span class="o">=</span><span class="bp">True</span><span class="p">,</span>
        <span class="n">capture_options</span><span class="o">=</span><span class="p">[</span>
            <span class="n">aws</span><span class="p">.</span><span class="n">sagemaker</span><span class="p">.</span><span class="n">EndpointConfigurationDataCaptureConfigCaptureOptionArgs</span><span class="p">(</span><span class="n">capture_mode</span><span class="o">=</span><span class="s">"Output"</span><span class="p">),</span>
            <span class="n">aws</span><span class="p">.</span><span class="n">sagemaker</span><span class="p">.</span><span class="n">EndpointConfigurationDataCaptureConfigCaptureOptionArgs</span><span class="p">(</span><span class="n">capture_mode</span><span class="o">=</span><span class="s">"Input"</span><span class="p">),</span>
        <span class="p">],</span>
        <span class="n">capture_content_type_header</span><span class="o">=</span><span class="n">aws</span><span class="p">.</span><span class="n">sagemaker</span><span class="p">.</span><span class="n">EndpointConfigurationDataCaptureConfigCaptureContentTypeHeaderArgs</span><span class="p">(</span>
            <span class="n">csv_content_types</span><span class="o">=</span><span class="p">[</span><span class="s">"text/csv"</span><span class="p">],</span> <span class="n">json_content_types</span><span class="o">=</span><span class="p">[</span><span class="s">"application/json"</span><span class="p">]</span>
        <span class="p">),</span>
    <span class="p">),</span>
    <span class="n">production_variants</span><span class="o">=</span><span class="p">[</span>
        <span class="n">aws</span><span class="p">.</span><span class="n">sagemaker</span><span class="p">.</span><span class="n">EndpointConfigurationProductionVariantArgs</span><span class="p">(</span>
            <span class="n">variant_name</span><span class="o">=</span><span class="s">'version_1'</span>
            <span class="n">model_name</span><span class="o">=</span><span class="p">[</span><span class="n">model</span> <span class="n">name</span><span class="p">],</span>
            <span class="n">initial_instance_count</span><span class="o">=</span><span class="mi">1</span><span class="p">,</span>
            <span class="n">instance_type</span><span class="o">=</span><span class="s">"ml.m5.xlarge"</span><span class="p">,</span>
        <span class="p">)</span>
    <span class="p">],</span>
<span class="p">)</span></code></pre></figure>

<h2 id="endpoint">Endpoint</h2>
<p>This resource is created by referring to the endpoint configuration created previously.</p>

<figure class="highlight"><pre><code class="language-python" data-lang="python"><span class="n">endpoint</span> <span class="o">=</span> <span class="n">aws</span><span class="p">.</span><span class="n">sagemaker</span><span class="p">.</span><span class="n">Endpoint</span><span class="p">(</span>
    <span class="n">resource_name</span><span class="o">=</span><span class="n">model_name</span><span class="p">,</span>
    <span class="n">name</span><span class="o">=</span><span class="n">model_name</span><span class="p">,</span>
    <span class="n">endpoint_config_name</span><span class="o">=</span><span class="n">endpoint_configuration</span><span class="p">.</span><span class="nb">id</span><span class="p">,</span>
<span class="p">)</span></code></pre></figure>

<h2 id="cloudwatch-log-group">Cloudwatch Log Group</h2>
<p>With a log group, warnings and error messages logged to <code class="language-plaintext highlighter-rouge">stdout</code> can be recorded, which is helpful for debugging and is considered industry best practice.</p>

<figure class="highlight"><pre><code class="language-python" data-lang="python"><span class="n">cloudwatch_logs</span> <span class="o">=</span> <span class="n">aws</span><span class="p">.</span><span class="n">cloudwatch</span><span class="p">.</span><span class="n">LogGroup</span><span class="p">(</span>
    <span class="n">resource_name</span><span class="o">=</span><span class="sa">f</span><span class="s">"/aws/sagemaker/Endpoints/</span><span class="si">{</span><span class="n">model_name</span><span class="si">}</span><span class="s">"</span><span class="p">,</span>
    <span class="n">name</span><span class="o">=</span><span class="sa">f</span><span class="s">"/aws/sagemaker/Endpoints/</span><span class="si">{</span><span class="n">model_name</span><span class="si">}</span><span class="s">"</span><span class="p">,</span>
    <span class="n">retention_in_days</span><span class="o">=</span><span class="mi">30</span><span class="p">,</span>
<span class="p">)</span></code></pre></figure>

<p>After adding these pulumi resources, the end point would be successfully created on AWS by running <code class="language-plaintext highlighter-rouge">pulumi up</code>.</p>]]></content><author><name>Ivan</name></author><category term="cloud" /><category term="cloud" /><category term="data-engineering" /><summary type="html"><![CDATA[Describing how to provision an endpoint on AWS Sagemaker with Pulumi and Python]]></summary></entry><entry><title type="html">Introduction to Infrastructure as Code (IaC)</title><link href="https://ivanpua.com/cloud/iac/" rel="alternate" type="text/html" title="Introduction to Infrastructure as Code (IaC)" /><published>2023-03-28T19:38:00+11:00</published><updated>2023-03-28T19:38:00+11:00</updated><id>https://ivanpua.com/cloud/iac</id><content type="html" xml:base="https://ivanpua.com/cloud/iac/"><![CDATA[<h2 id="what-is-iac">What is IaC?</h2>

<p>Infrastructure as code or IaC enables developers to programmatically create, deploy and manage cloud resources in an automated, consistent and <strong>scalable</strong> manner. Notice the emphasis on scalable – that means the IaC template will spin up the same resources with the same configuration every time unless the cloud provider itself changes its configuration. This reduces the operational overhead of creating cloud resources, enabling developers to focus on delivering high-quality software and services to their customers.</p>

<h2 id="why-do-we-need-iac">Why do we need IaC?</h2>
<p>Before IaC, developers would use a ‘Click-Ops’ method to create resources; essentially clicking on buttons, following the prompts, and referring to documentation if they get stuck. Alternatively, some developers would opt for cloud provider’s own CLI such as AWS CLI or Google Cloud Shell to deploy resources.</p>

<p>Using Click-Ops or the CLI can be a quick and straightforward way to create resources on the cloud, especially for small-scale projects and quick prototyping. It can be useful for small, one-off tasks or for exploring the capabilities of the cloud provider. But what if you were leading a team of 10 data engineers and data scientists and you want everyone to use the same cloud stack? You could create a guide and tell them to follow the setup themselves, however, it can quickly become cumbersome and error-prone when managing a large number of resources or complex infrastructure.</p>

<p>To address these issues, IaC tools are developed.</p>

<h2 id="types-of-iac-tools">Types of IaC tools</h2>

<p>There are two types of IaC tools – ones that are built in-house by cloud providers, and open source.</p>

<h3 id="iac-tools-by-cloud-providers">IaC tools by Cloud Providers</h3>
<ul>
  <li>AWS CloudFormation: AWS CloudFormation is a service that allows you to define your infrastructure as code using JSON or YAML. CloudFormation supports a wide range of AWS services and resources and also allows you to create custom resources using AWS Lambda.</li>
  <li>Azure Resource Manager (ARM): Azure Resource Manager is a service that allows you to define your infrastructure as code using JSON or YAML. ARM supports a wide range of Azure services and resources.</li>
  <li>Google Cloud Deployment Manager: Google Cloud Deployment Manager is a service that allows you to define your infrastructure as code using YAML or Jinja2 templates. Deployment Manager supports a wide range of Google Cloud Platform services and resources.</li>
</ul>

<h3 id="open-source">Open Source</h3>
<h4 id="terraform">Terraform</h4>
<p><a href="https://www.terraform.io/">Terraform</a> is an open-source IaC tool that allows you to define your infrastructure as code using a declarative language called HashiCorp Configuration Language (HCL) or JSON. HCL is the recommended language as it’s explicitly designed for Terraform. It currently enjoys a dominant position among open-source IaC platforms.</p>

<p>To deploy an AWS S3 bucket with Terraform, you will need to follow these steps:
a. Define the S3 bucket in your Terraform configuration file:</p>

<figure class="highlight"><pre><code class="language-python" data-lang="python"><span class="n">provider</span> <span class="s">"aws"</span> <span class="p">{</span>
  <span class="n">region</span> <span class="o">=</span> <span class="s">"us-east-1"</span>
<span class="p">}</span>

<span class="n">resource</span> <span class="s">"aws_s3_bucket"</span> <span class="s">"my_bucket"</span> <span class="p">{</span>
  <span class="n">bucket</span> <span class="o">=</span> <span class="s">"my-bucket-name"</span>
  <span class="n">acl</span> <span class="o">=</span> <span class="s">"private"</span>
  
  <span class="n">versioning</span> <span class="p">{</span>
    <span class="n">enabled</span> <span class="o">=</span> <span class="n">true</span>
  <span class="p">}</span>

  <span class="n">tags</span> <span class="o">=</span> <span class="p">{</span>
    <span class="n">Environment</span> <span class="o">=</span> <span class="s">"dev"</span>
  <span class="p">}</span>
<span class="p">}</span></code></pre></figure>

<p>b. Initialize Terraform in your project directory by running <code class="language-plaintext highlighter-rouge">terraform init</code>.
c. Create a Terraform execution plan by running <code class="language-plaintext highlighter-rouge">terraform plan</code>. This will show you the changes that Terraform will make to your infrastructure.
d. Apply the Terraform execution plan by running <code class="language-plaintext highlighter-rouge">terraform apply</code>. This will create the S3 bucket in your AWS account.</p>

<h4 id="pulumi">Pulumi</h4>
<p>Emerging as a fierce competitor to Terraform, <a href="https://www.pulumi.com/">Pulumi</a> is a universal infrastructure as code platform that allows you to use familiar programming languages and tools to build, deploy, and manage cloud infrastructure. To deploy an AWS S3 bucket with Pulumi, you will need to follow these steps:</p>

<p>a. Use the <code class="language-plaintext highlighter-rouge">pulumi_aws</code> Python library to create a resource.</p>

<figure class="highlight"><pre><code class="language-python" data-lang="python"><span class="kn">import</span> <span class="nn">pulumi</span>
<span class="kn">import</span> <span class="nn">pulumi_aws</span> <span class="k">as</span> <span class="n">aws</span>

<span class="c1"># Create an AWS resource (S3 Bucket)
</span>
<span class="n">my_bucket</span> <span class="o">=</span> <span class="n">aws</span><span class="p">.</span><span class="n">s3</span><span class="p">.</span><span class="n">Bucket</span><span class="p">(</span><span class="s">"my-bucket"</span><span class="p">,</span>
                          <span class="n">bucket</span><span class="o">=</span><span class="s">"my-bucket-name"</span><span class="p">,</span>
                          <span class="n">acl</span><span class="o">=</span><span class="s">"private"</span><span class="p">,</span>
                         <span class="p">)</span>

<span class="c1"># Export the name of the bucket
</span><span class="n">pulumi</span><span class="p">.</span><span class="n">export</span><span class="p">(</span><span class="s">'bucket_name'</span><span class="p">,</span>  <span class="n">bucket</span><span class="p">.</span><span class="nb">id</span><span class="p">)</span></code></pre></figure>

<p>b. Running <code class="language-plaintext highlighter-rouge">pulumi up</code> in the terminal will create the S3 bucket in your AWS account.</p>

<h3 id="terraform-vs-pulumi">Terraform vs Pulumi</h3>
<p>Both Terraform and Pulumi support a wide range of cloud providers, including AWS, Azure, and Google Cloud. The main difference between Pulumi and Terraform is that Pulumi allows you to define your infrastructure using a general-purpose programming language, while Terraform uses its own declarative language (focuses on the what) called HashiCorp Configuration Language (HCL) or JSON.</p>

<p>With Pulumi, you can use popular programming languages such as Python, JavaScript, Go, and TypeScript to define your infrastructure. This allows you to leverage the full power of a programming language to define, configure, and deploy your infrastructure. Pulumi also provides a set of libraries for working with cloud providers, allowing you to easily create and manage resources.On the other hand, Terraform is designed specifically for infrastructure as code and provides a domain-specific language (HCL) that is optimized for describing infrastructure resources. Terraform also has a large ecosystem of providers, which allows you to manage a wide range of cloud resources.</p>

<p>Here are some additional differences between Pulumi and Terraform:</p>
<ul>
  <li>Pulumi has a more procedural approach (how), while Terraform is more declarative (what).</li>
  <li>Pulumi supports more cloud providers than Terraform, including AWS, Azure, Google Cloud Platform, and Kubernetes.</li>
  <li>Pulumi allows for easier refactoring and reuse of infrastructure code, as it uses a programming language that is familiar to developers.</li>
  <li>Terraform has a larger community and ecosystem of providers, making it easier to find resources and examples for managing specific cloud resources.</li>
</ul>

<p>Ultimately, the choice between Pulumi and Terraform depends on your specific needs and preferences. If you prefer a general-purpose programming language and want more flexibility in defining your infrastructure, Pulumi may be a good choice. If you prefer a declarative approach and want to leverage a deeper and more stable knowledge base, Terraform may be a better fit.</p>]]></content><author><name>Ivan</name></author><category term="cloud" /><category term="cloud" /><summary type="html"><![CDATA[Explaning the concept of Infrastructure as Code (IaC) and popular IaC tools]]></summary></entry></feed>