Explain IAM like I’m 5 (AWS)
Mate, what in the world is IAM?
It is a permission system that regulates access to AWS resources.
Dumb it down for me please.
It’s AWS’ method of regulating permission among users. For example, if you are managing an organisation that consists of business analysts and data scientists, you would not want to grant the same permissions for both groups. In addition, IAM audits any changes to permissions and access using AWS Cloud Trail, therefore promoting transparency.

I see why that’s important – sounds like a pain to set up though
Not gonna lie, it is difficult, especially if you are starting from scratch. Imagine if you want to allow data scientists to build ML models on AWS. You will likely grant them permissions to access a data warehouse (Redshift), ML pipeline (Sagemaker), storage bucket for model artefacts (S3) … and this could easily blow up. However, AWS has made our lives easier by creating default policy templates (aka AWS-managed policies). Also, AWS has handy tools like CloudFormation to programmatically set up IAM, but that’s a topic for another day.
In this article, I will explain the basics of IAM and show you how to set them up for a single AWS microservice.
Important concepts before we dive in
Resource: An AWS Services (e.g. S3)
Action: List all S3 objects in a bucket
- Users - e.g. John Doe
- Groups - Collections of users (e.g. a group of business analysts)
- Policy - Low level permission to a resource (e.g. Allow / Deny a List action to a S3)
- Role - Collection of Policies
Keep in mind that role is a preset of policies for service(s) or users external to your organisations. Role is a way to provide permissions to someone (a customer, supplier, contractor, employee, an EC2 instance, some external application outside AWS trying to consume your services) without creating a user for it.
How do I set up IAM?
There are commonly 2 ways to set up IAM permissions, depending on your situation:
For a group of individuals within your organisation, the steps are:
- Create users groups
- Set up / add policies
- Add users to user group
For provisioning access to AWS resources or people outside your organisation, the steps are:
- Set up / add policies
- Create roles
- Assign role to users (optional – only required if you want to assign to a particular external user)
I’ll give a walk through of the second route (AWS resources or external users).
Example Walk-through
Let’s get into the nitty-gritty! Say you are tasked to set up AWS Glue access for a single Data Engineer for ETL purposes.
1. Set up / add policies
You could either add a AWS-managed policy e.g.AWSGlueConsoleFullAccess or create a customised policy based on the the following format.
{
    "Version": "2012-10-17",
    "Statement": [
        {
            "Sid": "VisualEditor0",
            "Effect": "Allow",
            "Action": [
                "glue:ListCrawls",
                "glue:ListJobs"
            ],
            "Resource": "*"
        }
    ]
}
The policy above allows users to list Glue crawlers and the jobs.
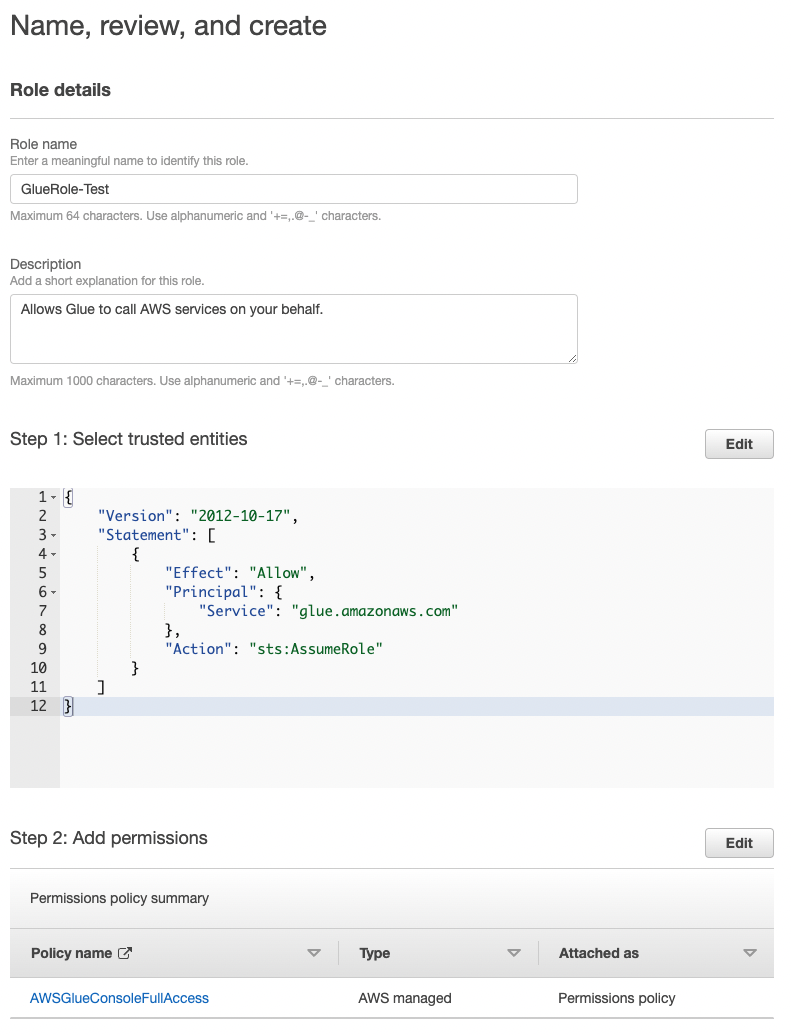
2. Create roles

If you want AWS Glue to assume this role (meaning that you are giving it permission to interact with other AWS microservices), then add a trust relationship as shown in image above.
3. Attach role to users
Generally all you need is the AWS ID of the external user(s). Refer to this documentation for the full steps.
Best Practices
According to AWS, we should always adopt a least privilege model, that means granting users the minimum set of permissions to accomplish their tasks. This prevents users from accessing sensitive data, or misusing other microservices.
However, in reality, it’s takes a long time to figure out what actions are needed for a particular resources (at least for me). When I’m the AWS admin of a new project, I tend to grant users full permissions to all actions for the relevant resources, to ensure they don’t encounter any permissions hurdles. Then, I will figure out which actions or resource are not needed, and filter them out. If you know a better method or any handy tools that improves this process, please comment it below.
Cheers! 😊

Comments